Binky Piñata (How to make it) / Piñata de Binky (Cómo hacerla)
Greetings, blogging community. Today I bring you an idea that will be useful for many parents who want to bring a smile to their children's faces because of the surprise and joy of seeing a #piñata of their favorite character or motif.
Reggito turned 4 years old 2 weeks ago and I made him a piñata based on his favorite character, Binky the cat, so I wanted to take advantage of the process to help all those interested in building their own piñatas for their particular celebrations and why not? for their own piñata business.
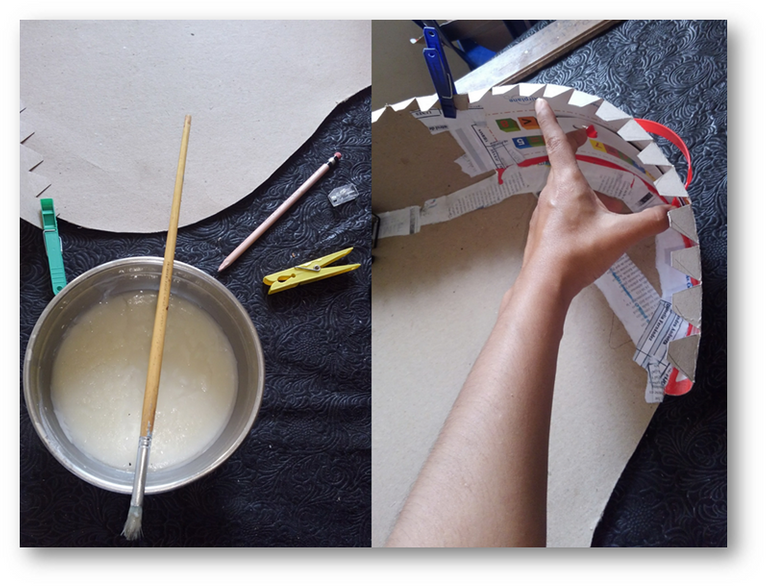
The first thing I should tell you is that the method to be used is the "piñata twisting" method, which is practical and has excellent results. On the other hand, the first step is to decide the motif of the piñata, for which it is good to talk or observe the tastes of your children and try to deduce it without them knowing, thus increasing the surprise.
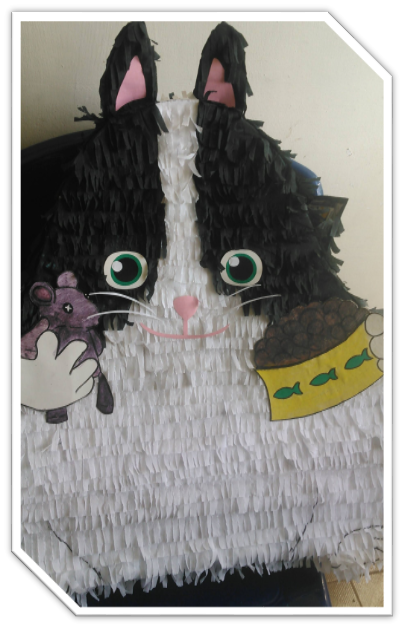
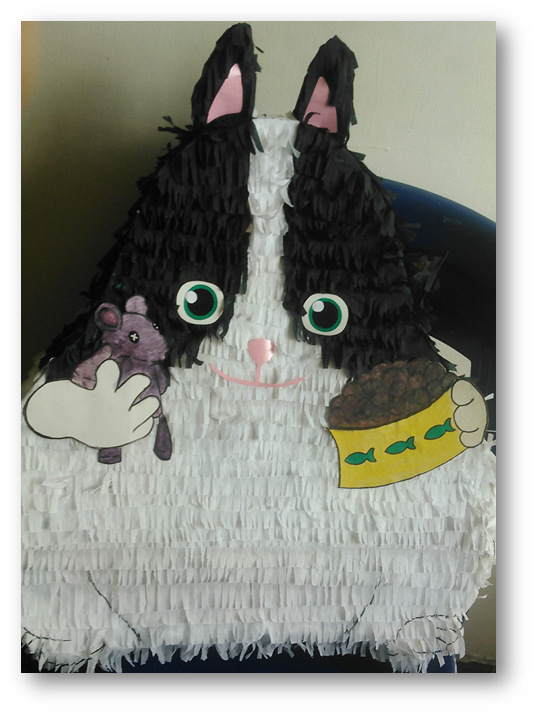
Once I chose the character that Reggito wanted (the cat Binky), I proceeded to research the character, that is, I observed his main characteristics: he is black and white, fat and chubby, as you can see in the picture above.
Saludos, comunidad de blogeros. Hoy les traigo una idea que será útil para muchos padres que quieran sacarle una sonrisa a sus niños por la sorpresa y alegría de ver una #piñata de su personaje o motivo favorito.
Reggito cumplió 4 años hace 2 semanas y le elaboré una piñata basada en su personaje favorito, el gato Binky, así que quise aprovechar el proceso para ayudar a todos aquellos interesados en construir sus propias piñatas para sus celebraciones particulares y ¿ por qué no? para su propio comercio de piñatas.
Lo primero que debo decirles es que el método a emplear será de “piñata entamborada”, que resulta práctica y de excelentes resultados. Por otro lado, el primer paso es decidir el motivo de la piñata, para lo que es bueno conversar u observar los gustos de sus niños e intentar deducirlo sin que ellos sepan, así aumenta la sorpresa.
Una vez elegido el personaje que quería Reggito (el gato Binky), procedí a realizar la investigación del personaje, es decir, observé sus principales características: es de color blanco y negro, es gordo y rechoncho, como se puede ver en la foto de arriba.
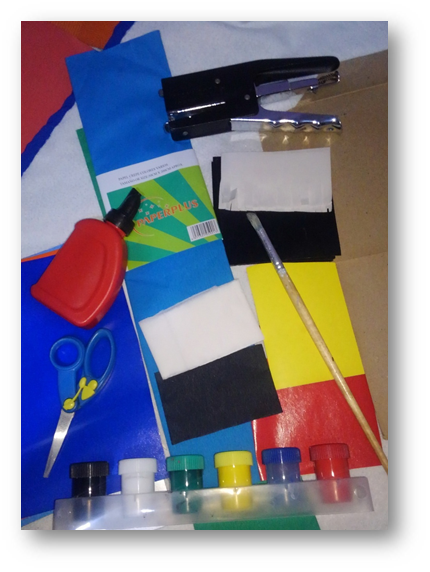
The materials I used were as follows:
- 1 sheet of 3 in kilo cardboard.
- 1 package of black crepe paper.
- 1 package of white crepe paper.
- Grease.
- Small brush or paintbrush to apply the paste.
- Scissors.
- Stapler.
- Supplies such as:
- Cardboard or construction paper or lustrillo with the colors - yellow, green, brown, brown, white.
- 1 pliego de cartón 3 en kilo.
- 1 paquete de papel crepé negro.
- 1 paquete de papel crepé blanco.
- Engrudo.
- Pincel o brocha pequeña para pasar el engrudo.
- Tijeras.
- Engrapadora.
- Materiales de provecho tales como:
- Cartulina o papel de construcción o lustrillo con los colores - amarillo, verde, marrón, blanco.
Process:
Directly on the cardboard sheet draw the silhouette of binky's body, freehand, then mark on cardboard the silhouette with the figure I cut out, so that they are two equal figures.
(If you don't want the piñata to break completely and the child can continue playing with it, you can open a door, like a rectangle open upwards on the lower center side of the figure, to open it when the children have finished beating the piñata) I didn't do it. It was suggested to me when I had already broken it.
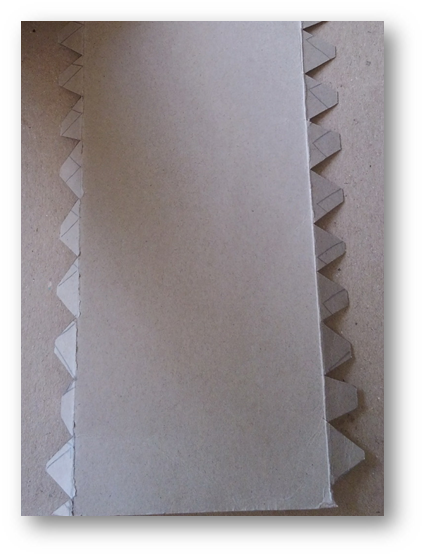
With the rest of the cardboard, I cut strips 16 cm wide (if you wish, you can make it wider), as long as I could; for my figure I needed a total of 181 cm long). If the cardboard sheet is not enough, as it happened to me, it can be completed with cardboard that you have at home. It depends on the size you want to make the piñata.
At both ends of the strips I marked a 2 cm wide border, where I then cut out triangles as shown in the photo (it is not necessary that the triangles are perfect), and when I finished cutting, fold them all to one side.
Proceso:
Directamente en el pliego de cartón dibuje la silueta del cuerpo de binky, a mano alzada, luego marque en cartón la silueta con la figura que recorté, para que sean dos figuras iguales.
(Si desean que la piñata no se rompa completamente y el niño pueda seguir jugando con ella, se le puede abrir una puerta, como un rectángulo abierto hacia arriba en lado central inferior de la figura, para abrirla cuando los niños hayan terminado de apalear a la piñata.) Yo no lo hice. Me lo sugirieron cuando ya la había roto.
Con el resto del cartón, corté tiras de 16 cm de ancho (si desea, puede hacerla más ancha), lo más larga que pude; para mi figura necesité en total 181 cm de largo). Si no alcanza el pliego de cartón, como me ocurrió, se completa con cartulina que tenga en casa. Depende del tamaño que quiera hacer la piñata.
En ambos extremos de las tiras marqué una orilla de 2 cm de ancho, donde luego recorté triángulos como se ve en la foto (no es necesario que los triángulos sean perfectos), y al terminar de cortar, doblarlas todas hacia un solo lado.

I cut an open rectangle at one end, which I chose to place on the upper side of the piñata, which will serve as an opening to put the piñata filling.
Recorté un rectángulo abierto en uno de los extremos, que elegí colocar a un lado superior de la piñata, que servirá de abertura para poderle meter el relleno de ésta.
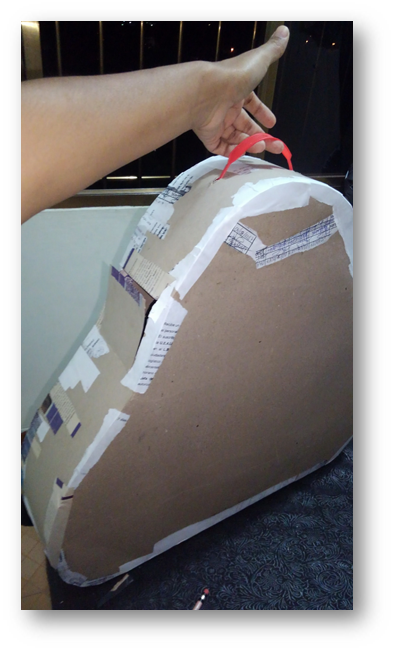
I had a toy box that I was about to throw away, which had a handle to hold it, and I thought it would be good to use it for the piñata, because that cardboard was similar to the one I was using. Then I cut out a perimeter strip from the box, and using the section where the handle was, I made its tabs.
Tenía una caja de juguetes que estaba por desechar, que tenía un asa para sostenerla, y me pareció bien usarla para la piñata, porque ese cartón era parecido al que yo estaba usando. Entonces recorté de la caja una tira perimetral, usando la sección donde estaba el asa, le hice sus pestañitas.
Piñata assembly
With the paste at hand, or glue mixed with water, (I would have used paper tape to speed up the process, but I didn't have any.) I started with the head.
Armado de la piñata
Con el engrudo a la mano, o pega mezclada con agua, (Yo hubiese usado cinta adhesiva de papel para agilizar el proceso, pero no tenía.) comencé por la cabeza.
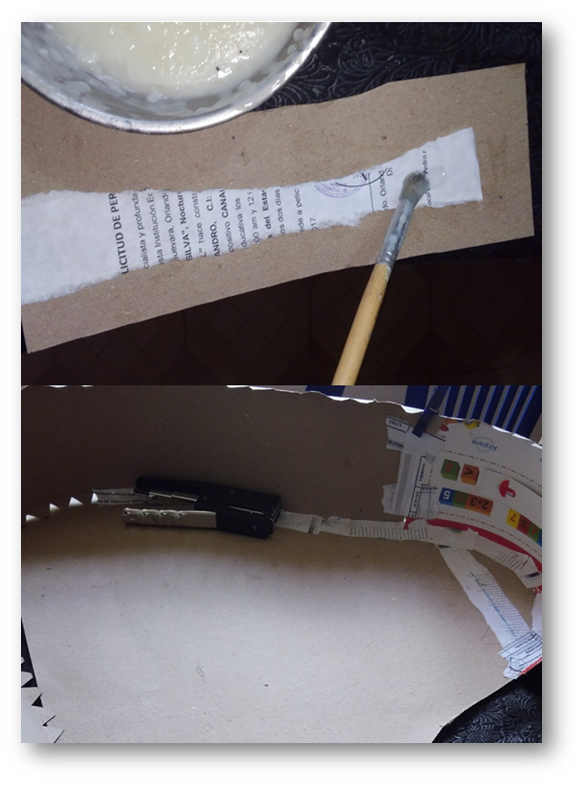
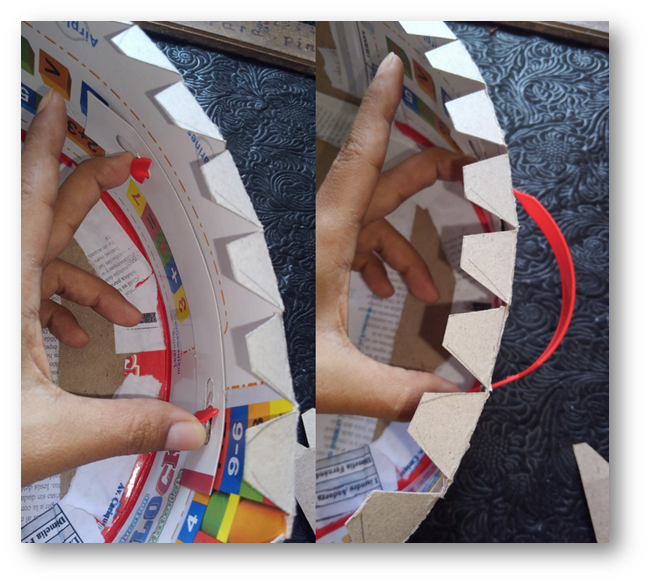
I proceeded to brush the tabs on one side of the strip and, with great care and patience, I joined them to one of the sides of the figure.
When joining the perimeter strip I used staples and hooks to hold it and to make it stick well.
And I reinforced it with strips of paper and paste, which I placed in all the joints.
This is what I did all around the figure
Procedí a pincelar las pestañas de un lado la tira y, con mucho cuidado y paciencia, las uní con una de las caras de la figura.
Al empatar la tira perimetral usé grapa y ganchos para sostenerla y para que se pegara bien.
Y reforcé con tiras de papel y engrudo, que fui colocando por todas las uniones.
Así hice por todo alrededor de la figura
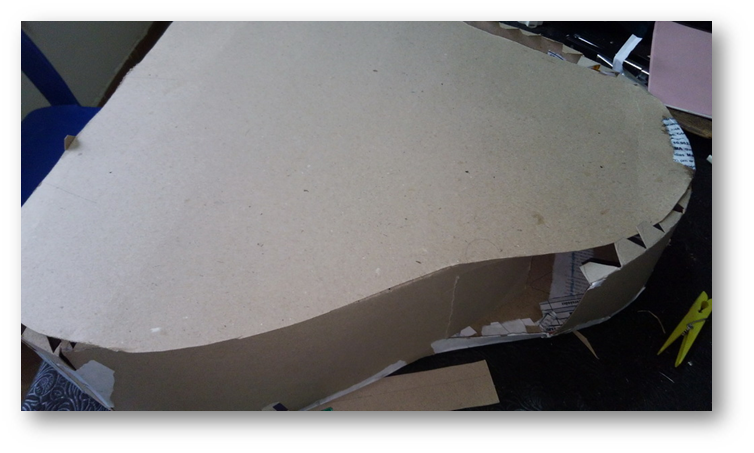
Same procedure with the other side, or figure, until it is completely closed.
Mismo procedimiento con la otra cara, o figura, hasta que quede completamente cerrada.
Wallpapering
With the crepe package in hand, and the measurement of the index finger as a reference for the width of the strips, I started cutting strips with the scissors. One package yields 5 or 6 strips.
Empapelado
Con el paquete crepé en mano, y la medida del dedo índice como referencia para el ancho de las tiras, empecé a cortar tiras con la tijera. De un paquete salen 5 o 6 tiras.
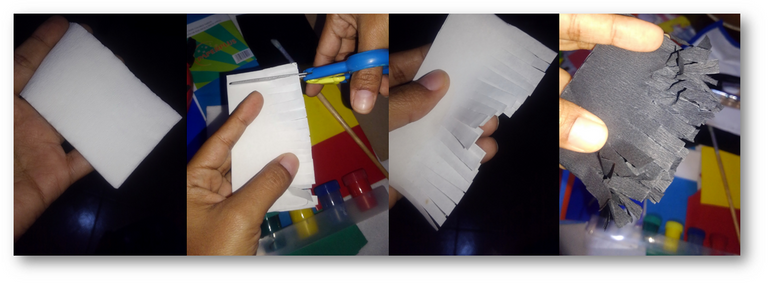
To each one I made cuts in a row, which will serve as Binky's hair.
With a colored pencil or pen, I marked the lines delimiting the black and white colors, the shape of the character's fur, both on the front and on the back.
If you wish, you can paste white paper in the areas where the white color goes.
A cada una le realicé cortes seguidos, que servirán a modo del pelo de Binky.
Con un lápiz de color o bolígrafo, marqué iban las líneas de delimitaban los colores blanco y negro, la forma del pelaje del personaje, tanto en la parte frontal, como en la parte posterior.
Si desea, puede pegar papel blanco en las zonas donde va el color blanco.
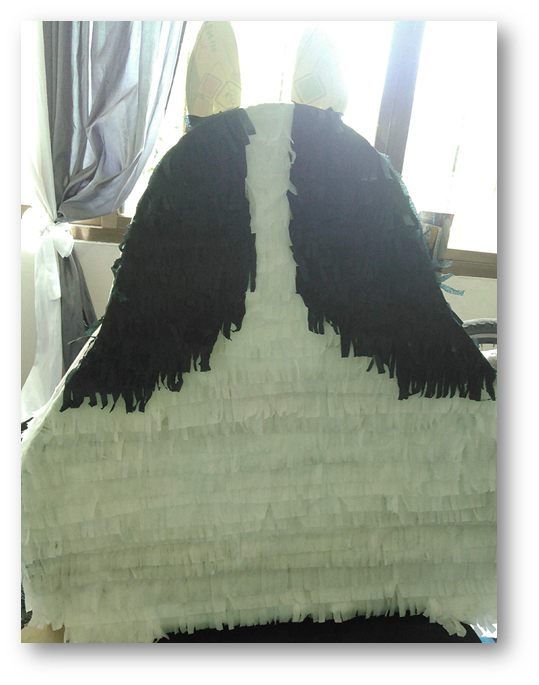
I started the treatment from the lower part of the front of the figure to the top.
I paint with paste or glue with water the base of the figure, from one end to the other, and then glue the white crepe strip.
I started with the white color, until I reached the black section.
Comencé el tratamiento desde la parte inferior del frente de la figura hasta arriba.
Pincelo con engrudo o pega con agua la base de la figura, de un extremo hasta el otro, para luego pegar la tira de crepe blanco.
Comencé con el color blanco, hasta que llegué la sección del color negro.
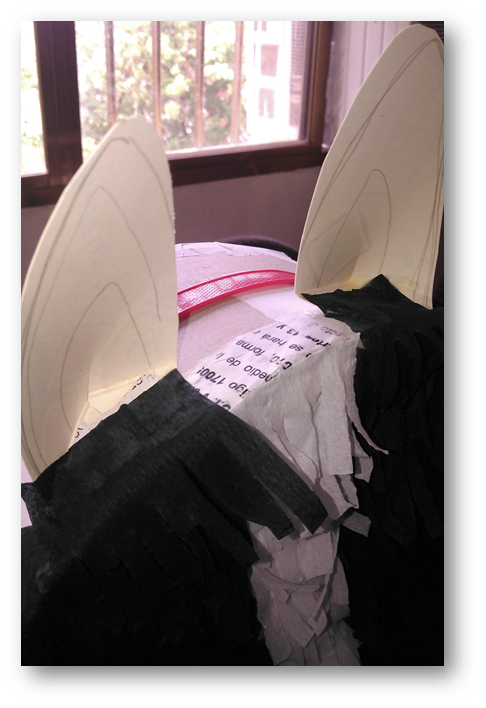
Don't forget the ears. It happened to me and I remembered it in the middle of the process. They also have black crepe.
No olviden las orejitas. A mí me pasó y lo recordé a mitad del proceso. También llevan crepé negro.
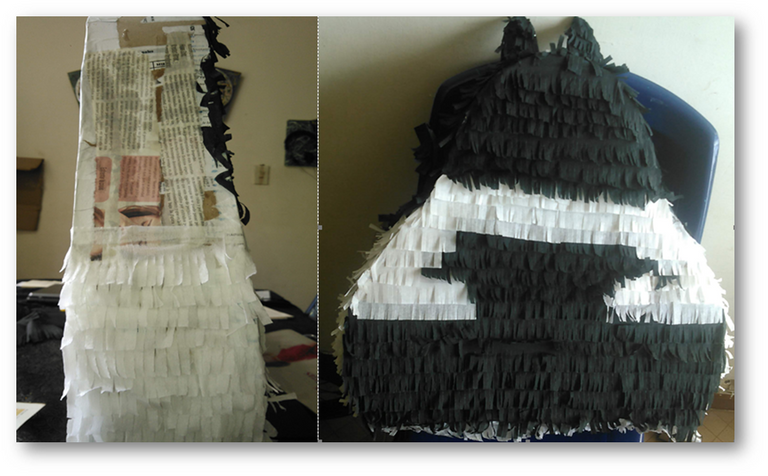
Same procedure for the edges and back side of the piñata.
Mismo procedimiento por los bordes y el lado posterior de la piñata
Accessories:
The piñata accessories are the eyes, ears, mouth and nose, (like the nursery rhyme) and don't forget your whiskers.
For the eyes I used white cardboard and white, green and black lustrillo paper. For the mouth, nose and ears, pale pink lustrillo paper.
And to reproduce the colors like the purple of the mouse, and the brown of the cat food, I used watercolors and finished by outlining details like the belly, paws and edges with marker.
Accesorios:
Los accesorios de la piñata son los ojos, orejas, boca y nariz, (Como la canción infantil) y no olviden sus bigotes.
Para los ojos utilicé cartulina blanca y papel lustrillo blanco, verde y negro. Para la boca nariz y orejas, papel lustrillo rosa pálido.
Y para reproducir los colores como el morado del ratón, y el marrón de la comida para gatos, usé acuarelas y finalicé delineando detalles como la barriga, patas y bordes con marcador.
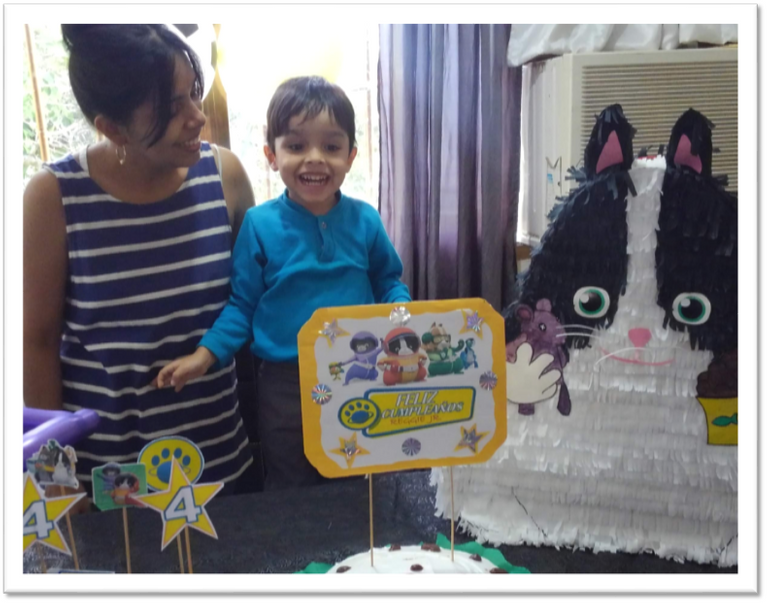
I'm with Reggito at his party, who is happy with Binky's motif.
Estoy con Reggito en su fiesta, quien está contento con el motivo de Binky.
This was the process of making this type of piñata. I hope you liked it and encouraged you to make your next piñatas by yourselves.
It doesn't matter if you don't have all the materials. Imagination and dedication have no limits.
See you next time.
Este fue el proceso de elaboración de este tipo de piñata. Espero les haya gustado y animado a realizar sus próximas piñatas ustedes mismos.
No importa si no tienen todos los materiales. La imaginación y la dedicación no tiene límites.
Hasta otra próxima publicación.
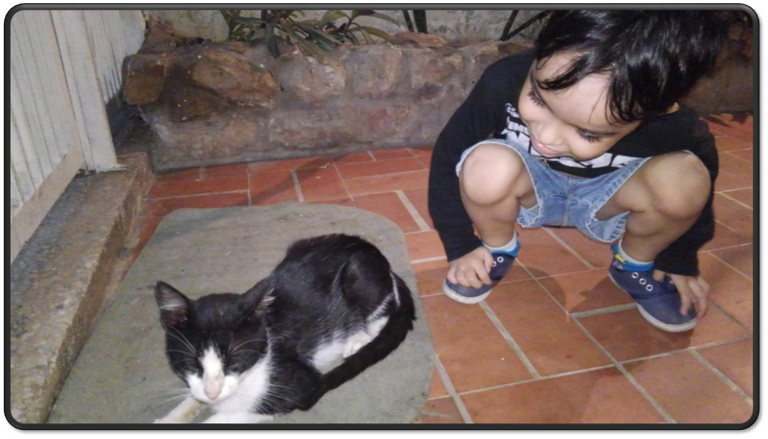
PD: Reggie Jeremiah and the real-life Binky we feed.
Reggie Jeremías y el Binky de la vida real que alimentamos.
Que maravilla que nos traigas un paso a paso de como hacer una hermosa piñata 😍😍😍👏👏👏.
Gracias @mayvil :)
Congratulations @fabiarte! You have completed the following achievement on the Hive blockchain and have been rewarded with new badge(s) :
Your next target is to reach 300 upvotes.
You can view your badges on your board and compare yourself to others in the Ranking
If you no longer want to receive notifications, reply to this comment with the word
STOPCheck out the last post from @hivebuzz:
Me gusta mucho esta publicación, por ser específica y ayudar a hacer una hermosa piñata en casa.