Dot Art on black paper | Part 1
Dot Art, this time on black paper
Lately, I've developed a new interest: dot art. I've been practicing on salt dough rounds to get the hang of it, and although it's nice to keep practicing on those, I also was ready to practice on a flat surface to have a better grip while dotting. If you're interested in the dot artworks I've made so far on these salt dough ornaments, you check out my last post here. From there you can go back to the previous parts. I love documenting this for future references and also to see my own progress along the way.
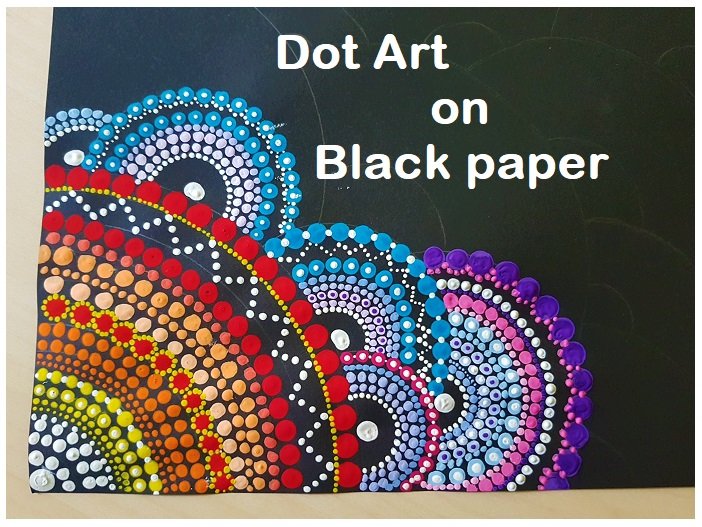
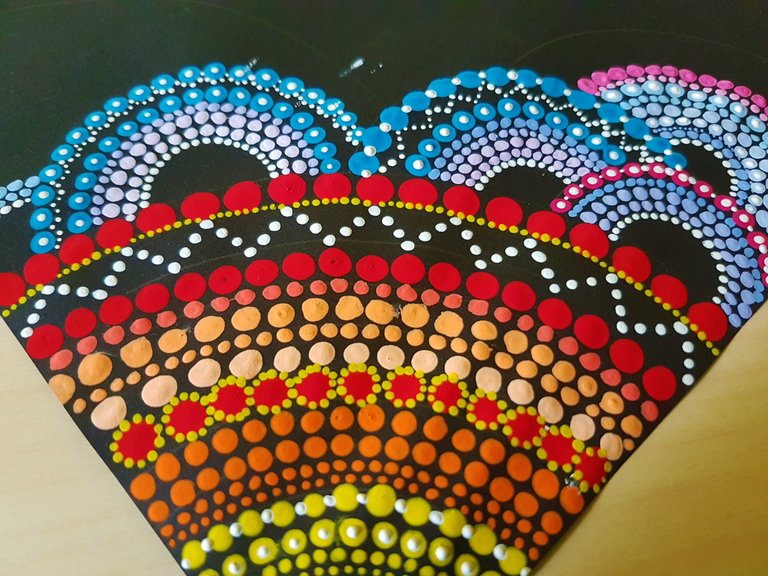
This weekend I decided to see if the lack of having good tools would not show as much when using a flat surface, in this case, black paper. Why black? I love dotting with bright colors and the contrast with black paper gives a cool effect. I first made some markings on the paper with a pencil to have a little bit of guiding where to place the dots. I was planning on using a lot of colors but as always, I will just see where my flow goes while creating. I started this one two days ago and planned on finishing it today, little did I know that I would finally find 1 dotting tool today, meaning I can now add more detail and layers. I decided to create a W.I.P. (work in progress) post now and one once it's finished. I don't want to rush this one as I think it has the potential to become pretty cool. So here's the first part, which already took me several hours...
The process
Where I just started dotting on the salt dough ornaments, as marking them with pencil wasn't an option, I have used some markings on this one to give some guidance on where the circles should end and start.
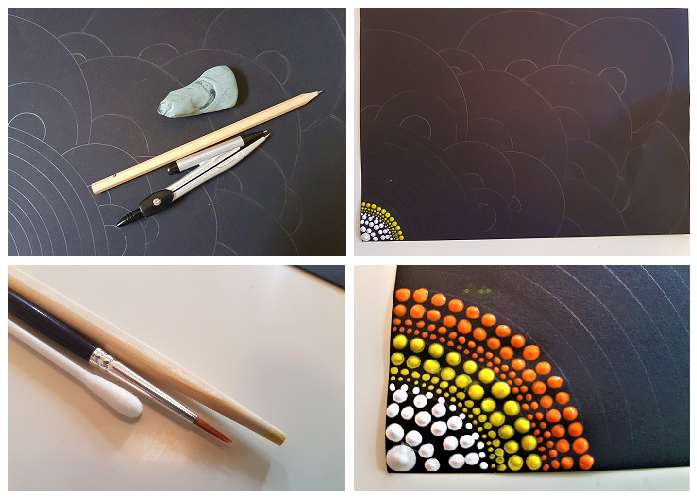
Then you can see which tools I've used to create the dots on this work, including two pictures of the first dots applied. One is zoomed in so you can see the colors clearly, the other is zoomed out to see the part that's been dotted (not done!). Luckily, I have been able to add a dotting tool today, check out the difference further in the post.
I tried using different shades of orange, purple and blue here, but it's such a pain mixing them without the right tools. I have been using one of the brushes to get the paint out of these (pretty small-sized) bottles, and then got left with paint on a brush that I wasn't going to use because the smaller ones were too small to take out the paint. Anyway, so far, the best tool to use for the bigger dots was the cotton swab, sushi stick, and then the smallest brush for the tiny dots. All the other round brushes in bigger sizes have proven to be just as bad on paper (to create a good dot) as it was on the ornaments (I hoped it would differ on paper).
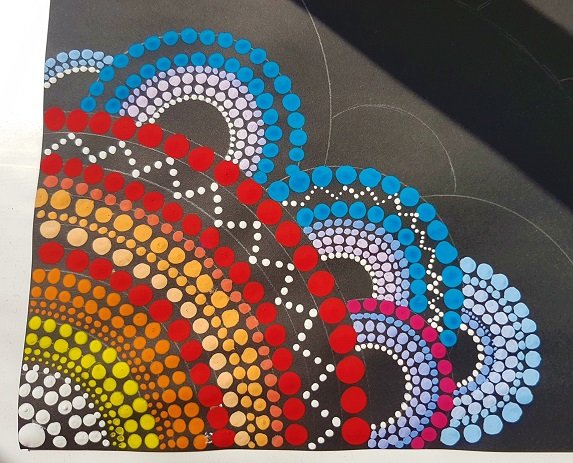
If you look at the picture above, you might think that this is a huge part of the total artwork, but here not even half of the paper has been covered in dots...
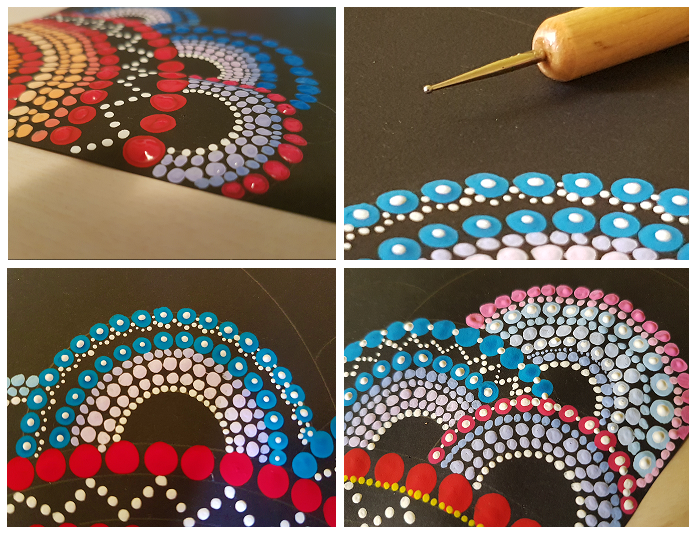
And there it was, finally, my first dotting tool! On the top right you can see the tool that has made dotting a lot easier today. And where I didn't put any layers on top of the bigger dots the past days, thinking I'd be done today, I started making layers and added small dots for details (lol) today using this tool. This tool is the reason the work is going to take me a bit longer than anticipated, which is fine. I can now have another look at it, and then one more to think of the next dots to add.
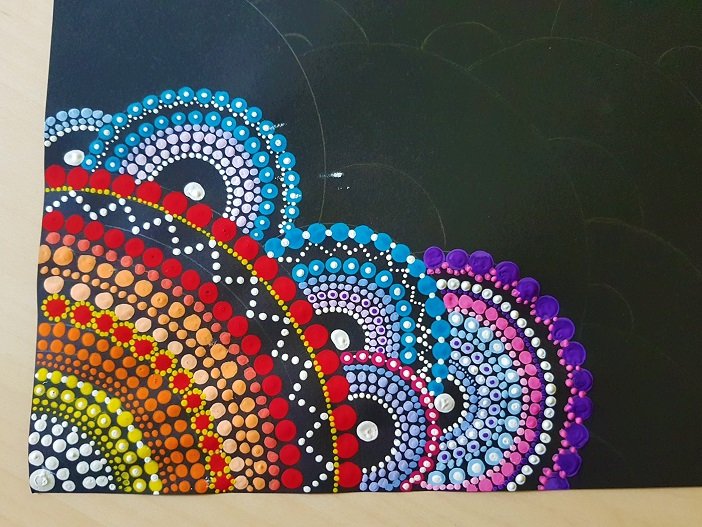
Not everything is made with the dotting tool though, as it's only meant to make small dots. The pink (bigger) dots at the right and the purple ones with the smaller pink dots were made with a normal brush, which was not the best idea. But I can hopefully cover that up once it's dry by adding another layer.
And, as you can see, I also accidentally touched a few dots and then touched the paper (ouch), but let's assume I can cover them in dots later on in the process as well.
The paper is now for about 1/3 covered in dots, but even that part isn't completely finished yet as I will add more detail along the way. I thought an A4 paper sized artwork would take me 1 day or so, I was wrong :) So see you in a few days with the end result!
I hope you liked this one as well, and if you have any tips or suggestions, be my guest and leave a comment.
Congratulations @thisismylife! You have completed the following achievement on the Hive blockchain and have been rewarded with new badge(s) :
You can view your badges on your board and compare to others on the Ranking
If you no longer want to receive notifications, reply to this comment with the word
STOPDo not miss the last post from @hivebuzz:
Support the HiveBuzz project. Vote for our proposal!
Looks like I made it just in time to upvote this lovely post! :>)
I would love these kind of little imperfections to stay. You're only human after all and there's beauty in imperfection.
I love how you share the creative process and this just looks and feels amazing(ly creative ) overall.
Enjoy the prolonged mindfulness.
Big hug,
Vincent
P.S. > I love documenting this for future references and also to see my own progress along the way.
One of the amazing benefits of the blockchain. It even gives you a timestamp and so much more :<)
Hey there @vincentnijman
How are you doing? I've been checking to see if you had new posts quite a few times, but so far no luck.
Oh trust me, they will keep appearing :) I'm almost (sigh) done with this one, probably tomorrow. Something important came up which caused me not to work on this one for a few days, or only a few dots lol.
True about the documenting, I already see progress myself. I think this one will end up very cool, even with the imperfections :) and the new paint I bought doesn't do that great with the old one, (only bought 750ml of white so I will have to manage now).
Anyway, thanks for stopping by and hopefully this one will be posted as a finished artwork very soon :) Enjoy the last bit of the weekend ..
Fixed that ;<)
I'm well but a break was much needed. Balancing energy isn't my forte.
Until next time and I hope your week is off to a great start.
Big hug!