How to secure your MongoDB on Ubuntu?
MongoDB is one of the most commonly used No SQL databases which is highly reliable for some projects. Most of my projects revolve around MongoDB and I hardly use other SQL databases. Recently I had been installing MongoDB and setting it up on multiple servers. But still, every time I do the activity, I always need a reference to do it. I don't have the steps by heart. After doing it on many servers already, I now know the steps. But I still thought it would be ideal to make a note of it somewhere and well blogging it is also a good idea indeed.
What happens if MongoDB is open and not secured?
I have had a bitter experience during my early days. When I started using the database for some of my live projects, during the initial days, I did not secure my databases with proper users and authentications. I once had this problem where one fine morning I woke up to see all the data erased from the database. The reason was that the data was open to everyone. Anyone with my server's IP would be able to connect to my MongoDB server and read all the data.
How bad it is huh? Ya, I had to learn it the hard way. To be honest it was not my intention but I was lazy to browse how to create user accounts and secure it. Now that I have done it quite a few times, it becomes convenient for me and whenever I set up a MongoDB server, the first thing I do is to add security.
Installation and setup
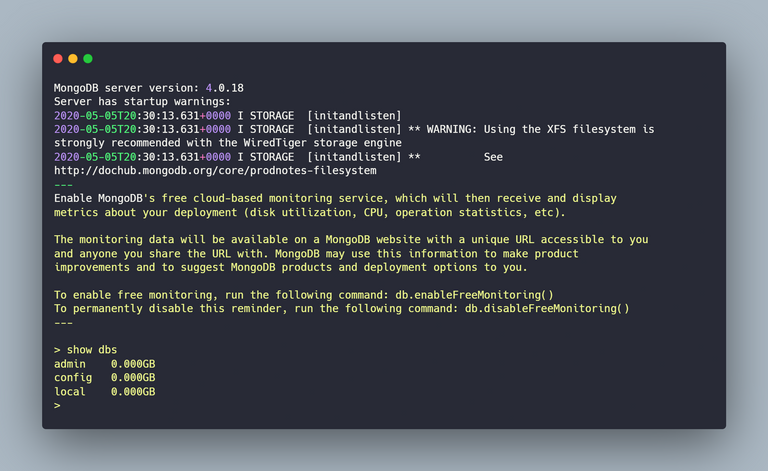
Assuming that installation is manageable, I would like to directly jump into securing part. In order to secure MongoDB, we have to first login to the mongo terminal.
$ mongo
As the server is now unrestricted, we will have all the access to all the databases. We can view all the available databases using the command show DBS. This is how we can create our first user.
We can create a user on the admin database with full rights. In this example, I will take superiorAdmin as my primary admin user. The below image shows how I structure my code to create the user.
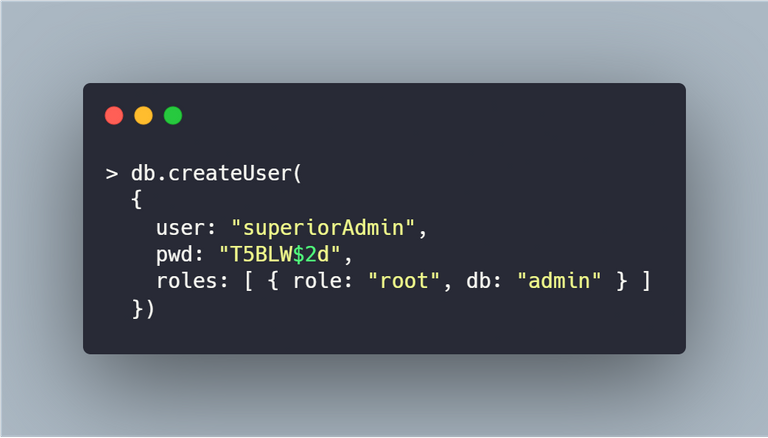
The above command will create a user account on the admin database with root access. As this user has root access, the user will be able to access all the other databases and manage the users in it. This user should be sufficient to get started but I always prefer creating individual users for individual databases. To test the user account that was created, I log in with the user "superiorAdmin".
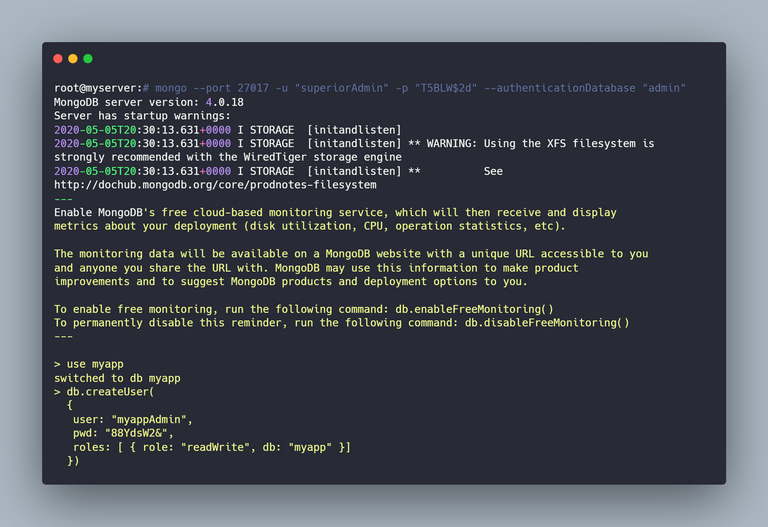
I then use myapp database which is assumed as my application's database and create a user called "map admin". This is the user I will be using in my config files or in the connection string. If you are using nodejs and mongoose, the connection string will look like the below.
mongodb://myappAdmin:88YdsW2&@localhost:27017/myapp
In the above connection string, the localhost can be replaced with your server's IP if your nodejs application is hosted on a different server. The same user creation steps can be repeated if we have multiple databases. The next important aspect is to restrict server security. For this, we have to navigate to the file mongod.conf in the location \etc\. We can open the config file in any of the text editors. I'm going to be using nano to edit the file.
$ sudo nano /etc/mongod.conf
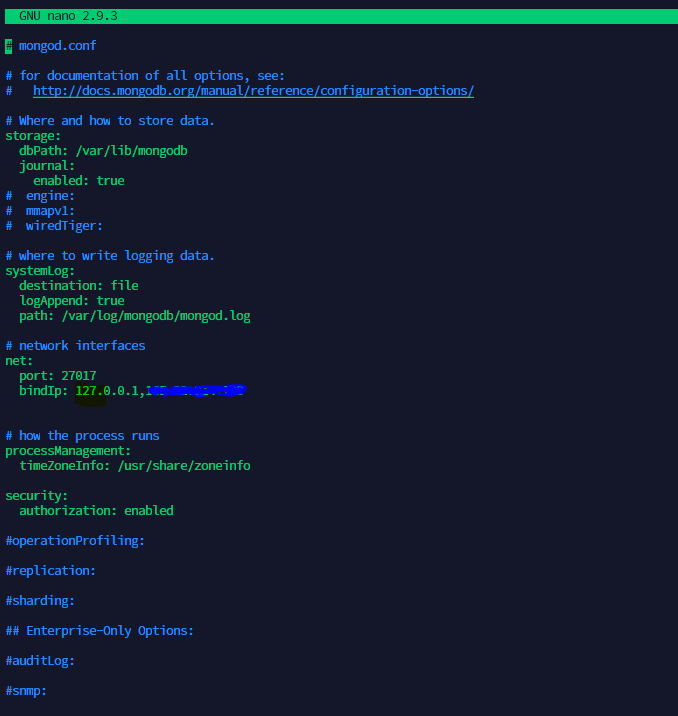
If you look at the above file, there are two places where we have to make changes. By default, the bind will have only the value 127.0.0.1 which is the localhost. If we would like to make this MongoDB server accessible outside with the IP address, we have to include the server IP address there.
The second thing that we have to be updating is security. The authorization should be set to enabled. By default, this option would either be commented on a new server or it would be disabled. We have to enable this option for our user accounts to start working. After enabling this option, only the users with appropriate access would be able to access the databases.
After this is all done, it is mandatory that we have to restart the MongoDB service for the changes to take effect. The below code would be helpful in restarting the service and also to check the status of the service.

After restarting the service, we are all set and ready. We can verify the connections for an authorized user as well as for an unauthorized user to ensure that it all looks good. The above instructions should be pretty much it for setting up MongoDB and accessing it inside our applications in a secure way.
All the images were prepared with the help of Carbon website.
If you find this article interesting, please vote, share and follow. Also, please share your thoughts in the comments section.


Posted via neoxian.city | The City of Neoxian
Twitter Link:
https://twitter.com/bala41288/status/1276235795704221697
Posted via neoxian.city | The City of Neoxian
thanks for sharing.
I have not worked on mongodb before, but this will be handy.
Yes I found it hard during the early days and things got easier when I made a note of all these steps. 😀