Let's make owls / Paper quilling technique Tutorial [Eng/Esp]
Hello everyone... 🐱🐾💕
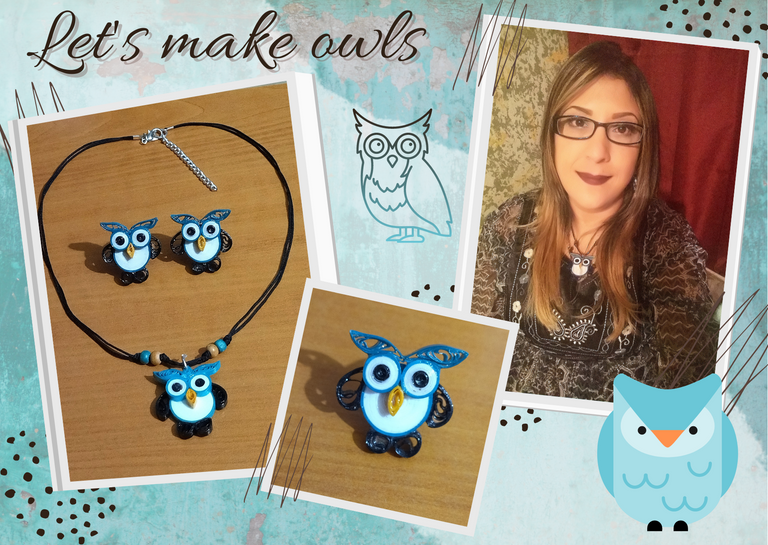
Hello to my dear Hiver and the dear community of #jewelry artists, as always very pleased and excited to be here again, showing you my work made with love and especially for you.
This time I bring you a beautiful owl-shaped pendant, made in the paper quilling technique, which you can make the color, combination and size of your preference, as well as you can make the pendants you want making the set that you like, either hanging tendrils, fixed, for necklace, for a bracelet, a pendant, keychain, or simply create the accessory that best suits you. Hoping it is to your liking:
Let's get started: 😃

Hola a todos... 🐱🐾💕
Hola a mis queridos Hiver y a la querida comunidad de artistas #jewelry, como siempre muy complacida y emocionada de encontrarme por acá nuevamente, mostrándole mi trabajo hecho con mucho amor y especialmente para ustedes.
En esta oportunidad les traigo un bonito dije en forma de búho, elaborado en la técnica de paper quilling, el cual tu podrás realizar del color, combinación y tamaño de tu preferencia, al igual que podrás elaborar los dijes que desees haciendo el conjunto que más te agrade, bien sean zarcillos colgantes, fijos, para collar, para una pulsera, un colgante, llavero, o simplemente crear el accesorio que más se adapte a ti. Esperando sea de su gusto:
Comencemos:😃

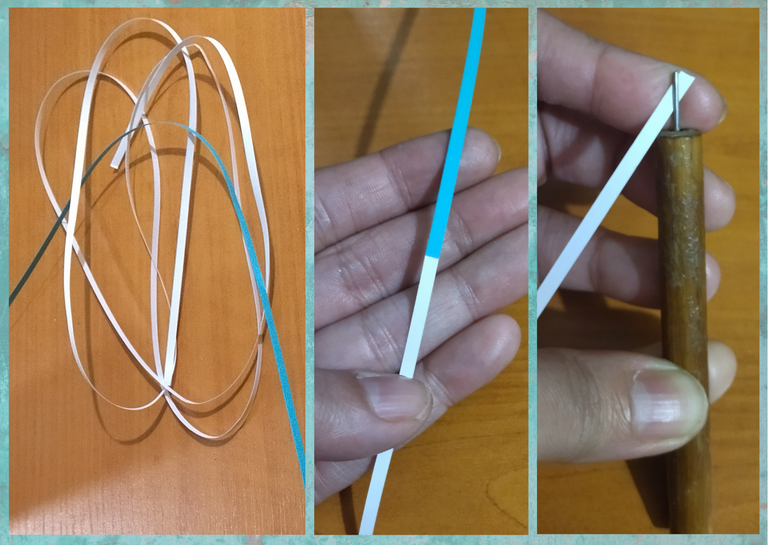
• Cintas de quilling de 3mm de ancho, color blanco, negro, aguamarina, anaranjado.
• Aguja para quilling.
• Tijera.
• Pega blanca extra fuerte.
• Regla con diversas medidas de circunferencias.
• Pincel.
• Base para zarcillos fija, tapa para zarcillos.
• Argolla de bisutería mediana.
• Alicate punta fina.
• Collar de tu preferencia.
- Quilling ribbons 3mm wide, white, black, aquamarine, orange.
- Quilling needle.
- Scissors.
- Extra strong white glue.
- Ruler with different circumference measures.
- Brush.
- Base for fixed tendrils, cover for tendrils.
- Medium size jewelry ring.
- Fine point pliers.
- Necklace of your choice.

I am going to show you the steps to make a single pendant. Depending on what you want to make, you will make the number of pieces of your preference. This pendant as each of the ones I usually make, can be adapted to be used as fixed tendrils, hanging tendrils, pendant for necklace or bracelet, as well as it has other varied and multiple uses. I mentioned this at the beginning of the post, but I always love to emphasize it. It's all about letting your imagination run wild.
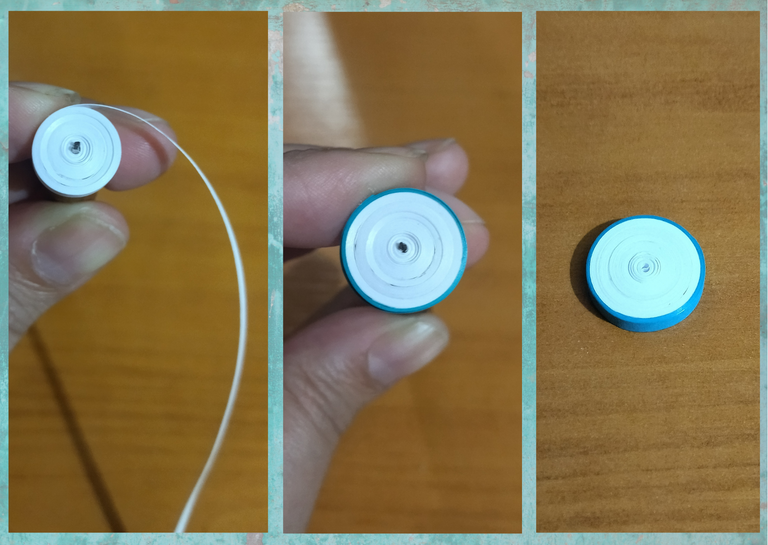
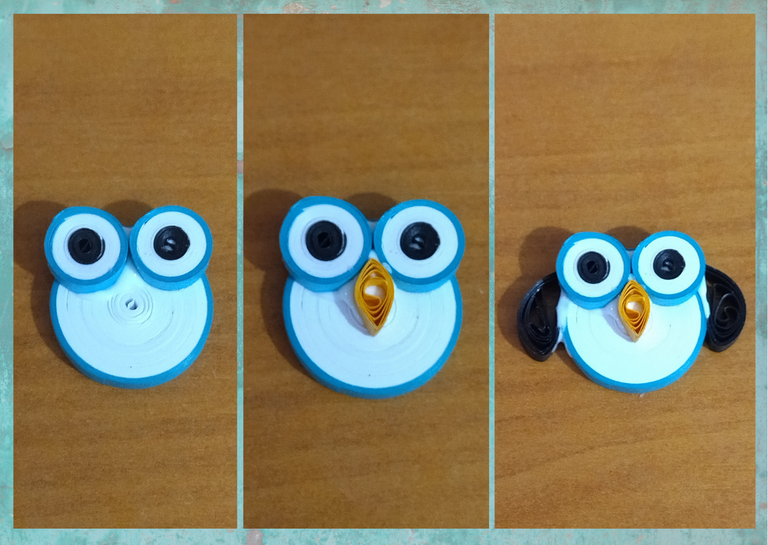
- Let's start with the body or base of the pendant: for this we will take white ribbon 3mm wide x 175cms long, if you don't have ribbons of that length simply glue them together to get the necessary length, we will also need aquamarine ribbon 3mm wide x 25cms long, this last piece of ribbon we will join it to the white ribbon forming a single ribbon. Once this step is done, we will take the quilling needle and we will start to roll the white part until we reach the end of the aquamarine ribbon, we seal with glue and we will get a tight circle which will be as I mentioned before, the base or body of our pendant.
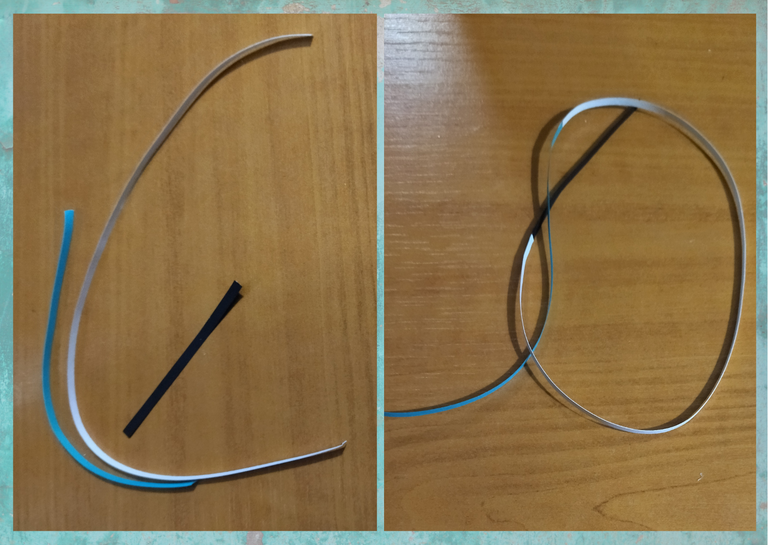
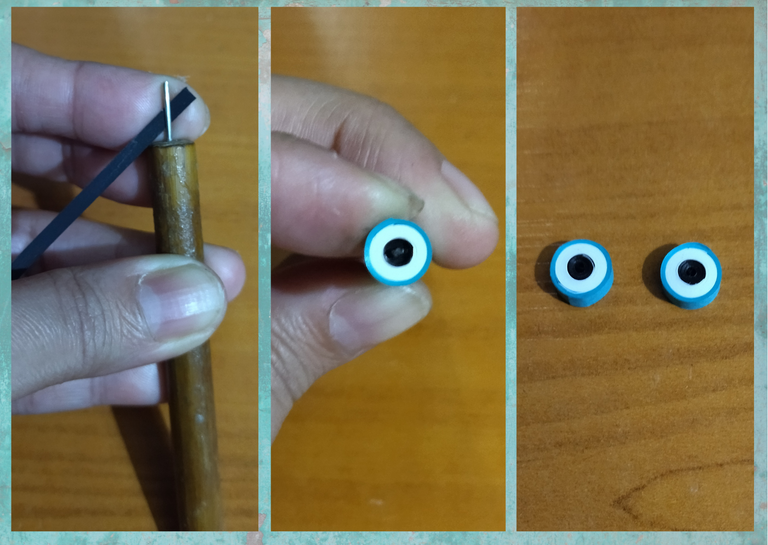
- Now we will make the eyes of our owl: we will take a piece of black ribbon 3mm wide x 6cms long, one of white ribbon 3mm wide x 25cms long and finally one of aquamarine ribbon 3mm wide x 12cms long, these three pieces of ribbon we will join them into one by sealing them with glue. We will roll with the quilling tape starting with the black part, when we finish rolling we glue, obtaining a tight circle that will be one of the eyes of our owl. Since we will need two eyes, we will repeat the process.
Les voy a mostrar los pasos para la elaboración de un solo dije. Ustedes según lo que deseen realizar, harán el número de piezas de su preferencia. Este dije como cada uno de los que usualmente elaboro, los podemos adaptar para utilizar como zarcillos fijos, zarcillos colgantes, dije para collar o pulsera, al igual que tiene otros variados y múltiples usos. Esto lo mencione al principio del post, pero siempre me encanta recalcarlo. Todo está en dejar volar tu imaginación.
• Vamos a comenzar con el cuerpo o base del dije: para ello vamos a tomar cinta blanca de 3mm de ancho x 175cms de largo, si no tienes cintas de ese largo simplemente las unirás con pega hasta conseguir el largo necesario, también necesitaremos cinta color aguamarina de 3mm de ancho x 25cms de largo, este último trozo de cinta lo vamos a unir a la con la blanca formando una sola cinta. Realizado este paso, tomaremos la aguja para quilling y comenzaremos a enrollar por la parte blanca hasta llegar al final de la cinta aguamarina, sellamos con pega y obtendremos un circulo apretado el cual será como mencione anteriormente, la base o cuerpo de nuestro dije.
• Ahora realizaremos los ojos de nuestro búho: tomaremos un trozo de cinta negra de 3mm de ancho x 6cms de largo, uno de cinta blanca de 3mm de ancho x 25cms de largo y por ultimo uno de cinta aguamarina de 3mm de ancho x 12cms de largo, estos tres trozos de cinta los vamos a unir en uno solo sellándolos con pega. Enrollaremos con la cinta para quilling comenzando por la parte negra al terminar de enrollar pegamos, obteniendo un circulo apretado que será uno de los ojos de nuestro búho. Ya que necesitaremos dos ojos, repetiremos el proceso.
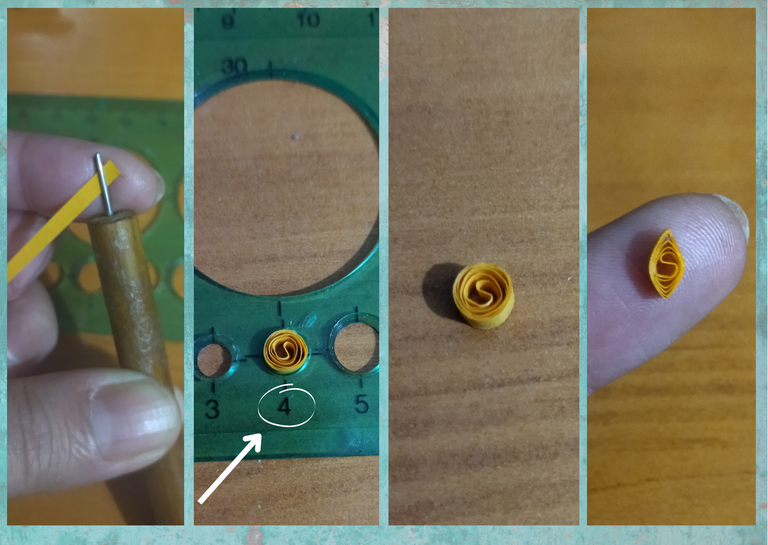
- Let's go with the owl's nose: we take a piece of orange ribbon 3mm wide x 7cms long, we roll it with the quilling needle and we are going to measure on the circumference ruler in the circular measure number 4, we take out of the ruler, we seal with glue, we are going to obtain a small closed circle to which we are going to give a diamond shape. This will be the nose of our owl.
- Let's make the arms of the owl: for these we will need a black ribbon of 3mm wide x 12cms long, we will roll it with the quilling needle and measure in the circumference ruler in the measure number 8, we will obtain an open circle, we take it out of the ruler, seal it with glue and give it the shape of a drop or teardrop shape. Just like this piece, we will need two.
If you want to see a more detailed procedure on how to make different shapes of the basic quilling figures. You can visit the following post by clicking here.
- Let's make the feet of the owl: we will take a piece of black ribbon 3mm wide x 6cms long, roll it with the quilling needle and measure on the ruler at the circumference number 5. We take it out of the ruler and we will shape it flattening with our fingers a little the top of the open circle that we obtained. As this piece we will need two.
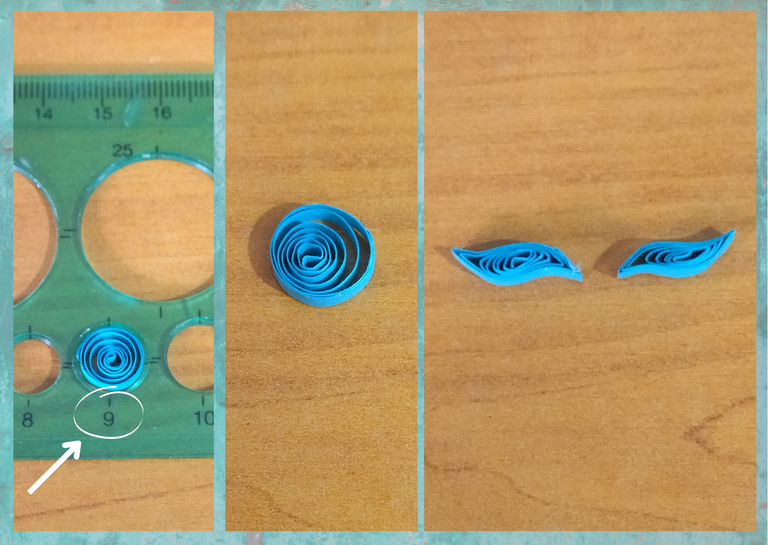
- Let's go with the owl's ears: we take a piece of aquamarine ribbon, 3mm wide x 14cms long, we roll it with the quilling needle, we take it out and measure on the ruler in the circle number 9, we take it out of the ruler and we will shape it with our fingers, in the image you will see and we will help you with it to get the right shape. We repeat the process since we will need two.
• Vamos con la nariz del búho: tomamos un trozo de cinta naranja de 3mm de ancho x 7cms de largo, enrollamos con la aguja para quilling y vamos a medir en la regla de circunferencia en la medida circular número 4, sacamos de la regla, sellamos con pega, vamos a obtener un pequeño círculo cerrado al que le vamos a dar forma de diamante. Esta será la nariz de nuestro búho.
• Realicemos los brazos del búho: para estos vamos a necesitar una cinta negra de 3mm de ancho x 12cms de largo, enrollaremos con la aguja para quilling y mediremos en la regla de circunferencia en la medida número 8, obtendremos un circulo abierto, sacamos de la regla sellamos con pega y daremos forma de gota o lagrima con forma. Así como esta pieza, necesitaremos dos.
Si deseas ver un procedimiento más detallado de cómo realizar diversas formas de las figuras básicas de quilling, puede visitar el siguiente post haciendo clip aquí
• Hagamos los pies del búho: tomaremos un trozo de cinta negra de 3mm de ancho x 6cms de largo, enrollamos con la aguja para quilling y mediremos en la regla en la circunferencia número 5. Sacamos de la regla y le daremos forma aplanando con los dedos un poco la parte de arriba del circulo abierto que obtuvimos. Como esta pieza necesitaremos dos.
• Vamos con las orejas del búho: tomamos un trozo de cinta color aguamarina, de 3mm de ancho x 14cms de largo, enrollamos con la aguja para quilling, sacamos y mediremos en la regla en el círculo número 9, sacamos de la regla y le daremos forma con los dedos, en la imagen verán y se ayudarán con ella para conseguir la forma adecuada. Repetimos el proceso ya que necesitaremos dos.


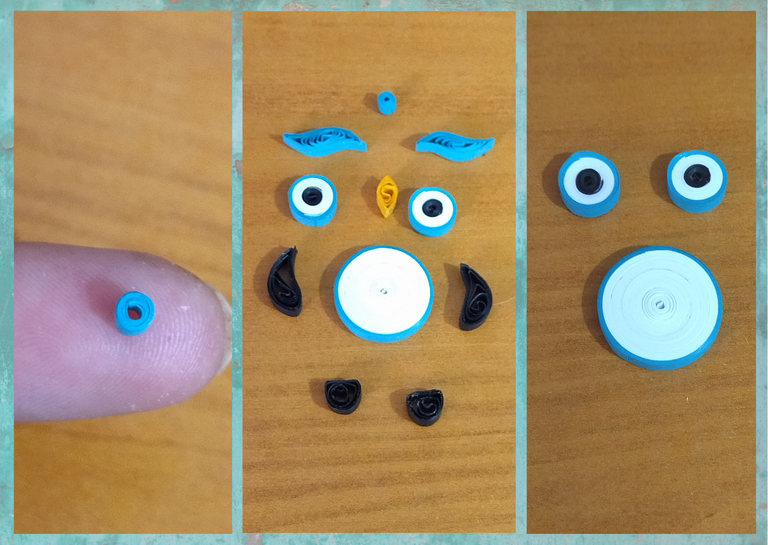
- Finally I will make a small closed circle with a piece of blue ribbon 3mm wide x 4cms long. This circle will be to place it at the top of the piece in this case in the central part of the owl's ears, this will be to place a ring and to be able to place our owl pendant either in a necklace, or to turn them into hanging tendrils if we add some hooks that are bases for this type of tendrils, if we are going to make some tendrils with fixed bases it will not be necessary to make this small piece.
- Finally we have our pieces ready, we are going to assemble our owl pendant, we take the base of the pendant that in this case will be the big tight circle that we made at the beginning, we take the eyes and we glue them so that they protrude a little from the top of the circle, the nose we will place it in the central part below the eyes, then we go with the arms that we will glue to the sides of the circle, the feet at the bottom, the ears just above the eyes and finally, the piece that will serve to place the ring we will place it in the central part of the ears. In the images I will show you the process of how the pieces should be glued, we will do it with extra strong white glue.
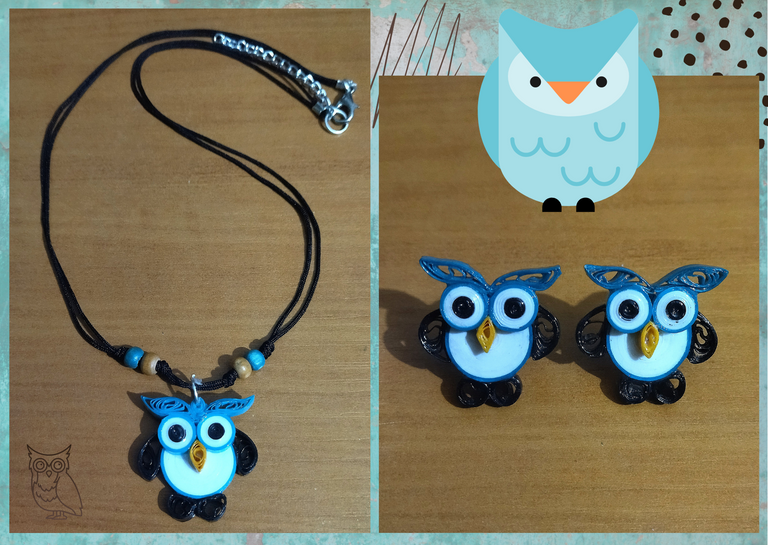
- Once our pendant is assembled, we will place the medium size costume jewelry ring in the hole of the small piece that we placed in the central part of the owl's ears.
- Finally, we add a few coats of extra strong glue to the piece to protect it, plasticize it and give it a shinier finish. I always recommend to use artistic resin dissolved with solvent x for a better protection, however, after having made several tests with extra strong glue, the one used for carpentry works, I decided to use it constantly in my works, since it gives a good protection and finish, besides it is a benefit for me for not having to manipulate so strong chemicals, since I have gone through delicate respiratory processes. In case you have to use it, I also recommend using a mask to protect the respiratory tract in case you are delicate in that part as it is happening with me.
• Por ultimo realizare un pequeño círculo cerrado con un trozo de cinta azul de 3mm ancho x 4cms de largo. Este círculo será para colocarlo en la parte de arriba de la pieza en este caso en la parte central de las orejas del búho, esto será para colocar una argolla y poder colocar nuestro dije de búho bien sea en un collar, o convertirlos en unos zarcillos colgantes si le añadimos unos anzuelos que son bases para este tipo de zarcillos, si vamos a realizar unos zarcillos con bases fijas no hará falta realizar esta pequeña pieza.
• Finamente tenemos listas nuestras piezas, vamos a armar nuestro dije de búho, tomamos la base del dije que en este caso será el circulo apretado grande que hicimos al principio, tomamos los ojos y los pegamos de manera que sobresalgan un poco de la parte de arriba del círculo, la nariz la ubicaremos en la parte central debajo de los ojos, luego vamos con los brazos que pegaremos a los lados del círculo, los pies en la parte de abajo, las orejas justo encima de los ojos y para finalizar, la pieza que servirá para colocar la argolla la ubicaremos en la parte central de las orejas. En las imágenes le dejare el proceso de cómo deben ser pegadas las piezas, lo haremos con pega blanca extra fuerte.
• Armado nuestro dije, colocaremos la argolla mediana de bisutería en el hoyo de la pequeña pieza que colocamos en la parte central de las orejas del búho.
• Para finalizar añadimos unas manos de pega extrafuerte a la pieza para protegerla, plastificarla, y darle un acabado más brillante. Siempre recomiendo para una mayor protección utilizar resina artística disuelta con solvente x, sin embargo, después de haber realizado varias pruebas con pega extrafuerte, la que es utilizada para trabajos de carpintería, decidí utilizarla de manera constante en mis trabajos, ya que da una buena protección y acabado, aparte es un beneficio para mi por no tener que manipular químicos tan fuertes, ya que he pasado por procesos respiratorios delicados. En caso de tener que usarla también recomiendo usar una máscara adecuada para proteger las vías respiratorias en caso de que seas delicado en esa parte al igual que está ocurriendo con mi persona.
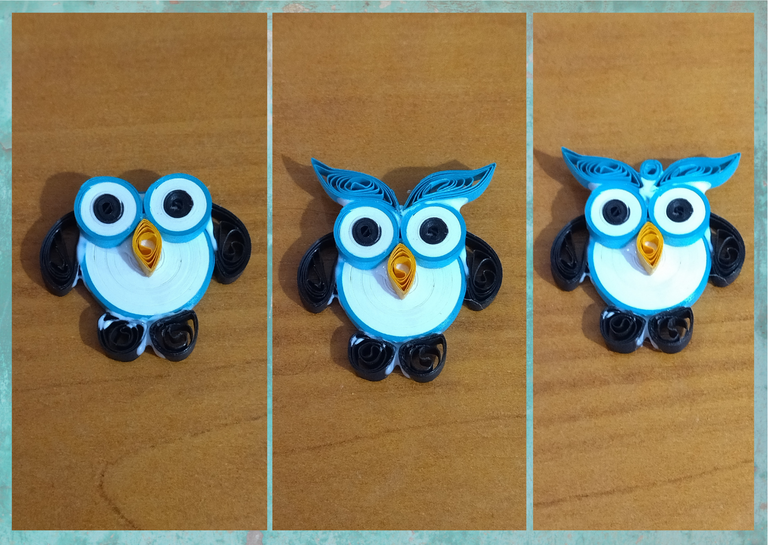

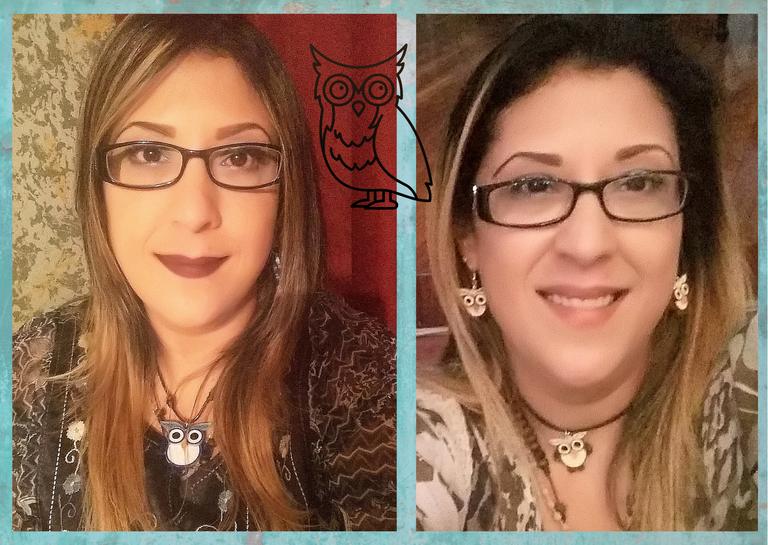
This way we have our owl charm ready for use, and to place it on the necklace or bracelet of your choice. As I told you at the beginning of the post I decided to show you the realization of a single piece, you can make as many as you need to create the set of your preference. Here I will also leave images of some fixed earrings that I had previously made, for my personal use.
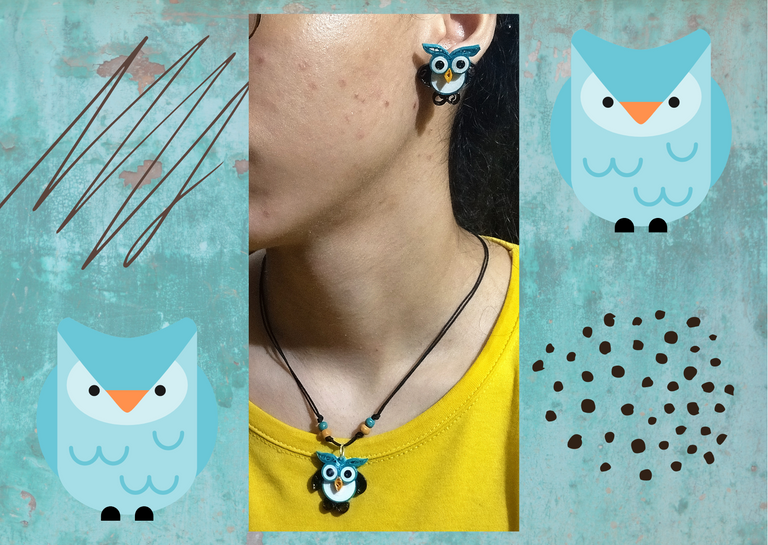
I will also leave a couple of pictures of me wearing a set of owls in a combination of colors, different sizes, with hanging earrings, so you can see that this type of accessories can be used in a casual way, as well as in a formal way. The ones that appear in the photos are no longer in my possession, because someone always ends up telling me to sell them or sometimes I give them away hahahaha.
De esta manera tenemos nuestro dije de búho listo para su uso, y para colocarlo en el collar, o pulsera que sea de su preferencia. Como les dije al principio del post decidí mostrarle la realización de una sola pieza, tu realizaras cuantas sean necesarias para crear el conjunto de tu preferencia. Por acá también les dejare imágenes de unos zarcillos fijos que tenía elaborados con anterioridad, para mi uso personal.
También les dejare un par de fotos de mi persona luciendo un conjunto de búhos en combinación de colores, tamaños diferentes, con unos zarcillos colgantes, para que observen que este tipo de accesorios te sirven para usarlo de manera casual, como también de manera formal. Los que aparecen en las fotos ya no están en mi poder, porque siempre alguna persona termina diciendo que se los venda o en ocasiones los regalo jajajaja.


What did you think, did you like it?
I hope you did, I hope you liked my explanation, procedure and photos, I made them with love for you.
"Let out that muse that inspires you, and let your imagination fly".
Thank you all, see you next time. 🐾🐱💕
¿Que les pareció, les gustó?
Espero que sí, que les haya gustado mi explicación, procedimiento y fotos, los hice con mucho cariño por y para ustedes.
"Deja salir esa musa que te inspira, y deja volar tu imaginación".
Gracias a todos, nos vemos en la próxima. 🐾🐱💕
Todas las fotos usadas en este post son de mi autoría y han sido sacadas en mi celular personal un Redmi 9T y editadas Canva Banner y separador hecho por mí en Canva Traducido con la ayuda de DeepL

Que hermosa técnica amiga 😻 me gustó mucho el resultado está genial 😊.
Felicidades muy buen post 👏👏
Mil gracias por pasar y por tu bonito comentario. Me alegra mucho que te gustara @yurimar ✨
Muchas gracias por el apoyo. Éxitos en su proyecto @mayvileros ✨
https://twitter.com/Darcy1387/status/1573061684155281408
https://twitter.com/edwing357/status/1573334019290562560
The rewards earned on this comment will go directly to the people( @dayadam, @edwing357 ) sharing the post on Twitter as long as they are registered with @poshtoken. Sign up at https://hiveposh.com.
Quiero unos ✨🥹 que hermoso te quedaron. @dayadam excelente trabajo.
Todos los que quieras mi corazón. A la orden por aquí ante cualquier duda. Se que siguiendo mi tutorial los vas a hacer hermosos, tienes gran talento. Saludos @mili2801 💕
Que hermosos❤️❤️. Saludos🤗
Gracias @delvallecedeno ✨
Están divinos
Gracias cariño. Saludos @jorgelissanchez 💖
Te quedaron preciosos querida @dayadam ...me encantó cada detalle de los búhos. Me hace muy feliz porque soy amante de los búhos. Gracias por compartir tu trabajo.
🎆🎇🎉🎊🌧️💐✨🌾🌱🌹🌙🌿🍃🥀⚡🌺☘️🍀🌈🌷⭐🪴🌵🌸🌟💮🌴🌳💫☀️💮☔🌲🌳🌍🌌🌠☄️🏵️🐝🌻🌼🍄🐞🦋💙☕💜🍍🎆🎇🎉🎊🎆🎇🎉🎊🌧️💐✨🌾🌱🌹🌙🌿🍃🥀⚡🌺☘️🍀🌈🌷⭐🪴🌵🌸🌟💮🌴🌳💫☀️💮☔🌲🌳🌍🌌🌠☄️🏵️🐝🌻🌼🍄🐞🦋💙☕💜🍍🎆🎇🎉🎊
Gracias mi bella @chacald.dcymt 😍 Me alegra enormemente que te hayan gustado. Sabes que en algún momento tendrás unos para ti, con todo mi amor. Cuenta con ello. Gracias por siempre estar aquí. Mil bendiciones 💖
Hermosos búhos, siempre con tu arte y creatividad
Esa técnica debe ser muy relajante.
Quiero mi gatito.
Gracias por tus bellas palabras en cada uno de mis trabajos amiga @soyanafuentes 💖 Me alegra que te hayan gustado. Y si, es una técnica bastante relajante mientras no se trabaje apresuradamente. Y los gatitos, todos los que quieras y cuando quieras 😽🐾
Hola amiga, esto te quedo muy bonito y además veo que no es nada fácil hacer este tipo de manualidades, por cada detalle que hace, pero se logró conseguir ese fabuloso Búho. Gracias por compartirlo con nosotros, saludos.
Gracias amigo @norberto1 por sus palabras. Me alegra muchísimo que le guste mi trabajo. La verdad no es tan fácil como se ve, sin embargo con amor y paciencia todo se logra, y es una técnica muy bonita y relajante. Bendiciones y que tenga una bella noche.✨
Que hermoso te quedo tu creación amiga @dayadam y esta vez fuiste la modelo, maravillosaaaaa mujer un abrazo grande. 🤭💞🤗
Gracias mi amor tu siempre tan hermosa @karelysk89. Abrazos y bendiciones... 💖
Demasiado derrecho de creatividad y ternura.. Como es costumbre, quedo impresionado por tanta belleza... Saludos querida amiga <3
Gracias mi querido amigo y gran artista @fixie. Siempre con tus hermosas palabras tan gratas para mi. Me encanta que te gustara. Mil bendiciones...💕
Que bello amiga @dayadam , siempre es un gusto ver tus post, utiilizas una tecnica impecable y logras siempre converti esas cintas de quilling en maravilla. Felicidades!!!! Toda mi admiración para ti😍
Gracias amiga @lileisabel. Honrada de recibir elogios de una persona tan talentosa como tu. Bendiciones💖
Nada que agradecer amiga, todo es merecido ❤️💋🤩
Que hermosos esos buhitos, lo que más me gusta es que pueden funcionar para varias cosas, como llaveros, zarcillos, collares, muy hermosos y funcionales la verdad. Saludos amiga!<3
Mil gracias amigo @chemi.art, por pasar por aquí y por tu comentario de gran valor para mi. Me alegra muchísimo que te haya gustado mi trabajo. Mil bendiciones... ✨
Qué conjunto tan hermoso querida @dayadam , esos búhos sí que están sorprendente HERMOSOS felicidades por tan lindo trabajo🌻💐🌸💮🏵️🌼🌷🌹🌻💐🌸💮🏵️🌼🌷🌹🌻💐🌸💮🏵️🌼🌷🌹🌻💐🌸💮🏵️🌼🌷🌹🌻💐🌸💮🏵️🌼🌷🌹🌻💐🌸💮🏵️🌼🌷🌹.
Mil gracias amiga @taniagonzalez. Que bello que te haya gustado mi trabajo, me gratifica mucho tu comentario, tiene gran valor para mi viniendo de una gran creativa como tu. Un fuerte abrazo. Bendiciones... 💕
Gracias por tan lindas palabras pero, hay que darle honor a los que lo merecen y ese trabajo tan bello se lleva hoy todos los créditos. Feliz día 🌻💐🌸💮🏵️🌼🌷🌹🌻💐🌸💮🏵️🌼🌷🌹🌻💐🌸💮🏵️🌼🌷🌹🌻💐🌸💮🏵️🌼🌷🌹🌻💐🌸💮🏵️🌼🌷🌹🌻💐🌸💮🏵️🌼🌷🌹.
¡Felicidades! Esta publicación obtuvo upvote y fue compartido por @la-colmena, un proyecto de Curación Manual para la comunidad hispana de Hive que cuenta con el respaldo de @curie.
Si te gusta el trabajo que hacemos, te invitamos a darle tu voto a este comentario y a votar como testigo por Curie.
Si quieres saber más sobre nuestro proyecto, acompáñanos en Discord: La Colmena.
Muchísimas gracias por su gran apoyo @la-colmena y @curie. Es un honor y tiene gran valor para mi. Mil éxitos en su maravilloso proyecto✨
Como siempre un hermoso trabajo @dayadam, están muy cuchi y a ti te ha quedado puesto tan lindo como el búho mismo.
Te ves rosagante y feliz de usar tus propios accesorios.
Que bueno que puedas usar el comodín debla pega extra fuerte y que no te afecte tanto como el otro material que es más fuerte, para esos malestares que has tenido.
Gracias mi bella amiga @leidimarc por estar presente y por tus maravillosos comentarios, son de gran valor para mi. Me alegra que te gustaran los buhitos. De verdad me encanta lucir el trabajo que hago. Gracias por tantos halagos.
Con respecto a la pega extra fuerte, gracias a Dios conseguí ese sustituto maravilloso, y tiene el mismo efecto que la resina y no me afecta para nada usarlo, seria imposible para mi en este momento utilizar resina, hubiese tenido quizás que dejar a un lado mi trabajo.
Bendiciones infinitas para ti... 💖
Me encanta 🤩 los búhos .
Que hermosa estaba estimada 😌
Gracias mi amor. Me alegra mucho que te gustara el trabajo. Siempre eres bienvenida por aquí. Abrazos @sarix 💖
Congratulations @dayadam! You have completed the following achievement on the Hive blockchain and have been rewarded with new badge(s):
Your next target is to reach 20000 upvotes.
You can view your badges on your board and compare yourself to others in the Ranking
If you no longer want to receive notifications, reply to this comment with the word
STOPCheck out the last post from @hivebuzz:
Support the HiveBuzz project. Vote for our proposal!
Gracias @hivebuzz ✨
Amiga @dayadam que hermosos accesorios en forma de búho 🦉, nos encanta el acabado que le has dado 100% original como siempre un gran diseño, estos búhos se ven muy tiernos y te quedan preciosos puestos. Gracias por este excelente paso a paso como siempre 👏
@hive-189504 De verdad muchísimas gracias por el comentario tan bello que hacen de mi trabajo. Honrada enormemente que les haya gustado este nuevo accesorio que les presente hoy. Espero seguir dando lo mejor de mi, y compartirles cosas que sean de su gusto y por su puesto de todo el que lo aprecie, esa es la idea, lo hago con mucho entusiasmo y amor. Espero también estar mas a menudo con ustedes, se me han presentado múltiples inconvenientes, a nivel de salud y servicios que no me han dejado estar presente como quisiera. Saludos y mil bendiciones. Éxitos para esta mi maravillosa comunidad✨
Aahhhhh que precioso me muero
Me encantan los búhos, excelente trabajo 😍
Ainssss ya se por donde va a comenzar ese trueque, solo grita el tamaño, la combinación y el estilo que vaya contigo amiga @irenenavarroart jajajaja. Es mas que trueque te regalo los que quieras, te lo mereces. Cuando quieras💖 Me alegra mucho verte por aquí y saber que te gusto el trabajo y que es una pieza que en lo personal es de tu gusto. Abrazos e infinitas bendiciones para ti ✨
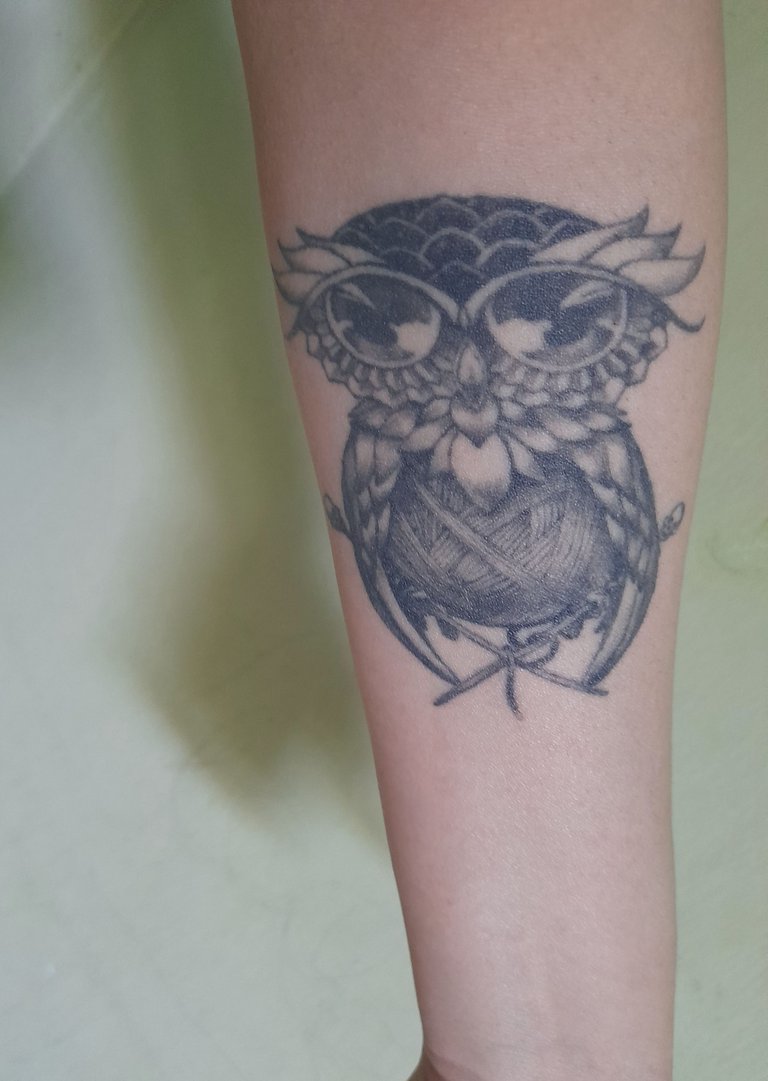
Es que mira nada mas mi brazo 😄 me gustan mucho los búhos
Me encanta como hiciste todas sus partecitas 🤩
Ahhhhh ya lo entiendo todo @irenenavarroart jajajajaja. Que belleza de tatuaje. Lo ame😍
Yo tambien tengo uno justo en esa parte del brazo, pero es de colores jajajaja.
En lo que pueda voy por otro... Amo los tatuajes, los piercing. Y mucho mas...
I think it is fantastic, @dayadam !
It takes patience rolling those...
Too bad you live so far away~
!LADY
View or trade
LOHtokens.@silversaver888, you successfully shared 0.1000 LOH with @dayadam and you earned 0.1000 LOH as tips. (8/30 calls)
Use !LADY command to share LOH! More details available in this post.
Thanks @ladytoken ✨
What a beautiful friend @silversaver888 I love to see you here and that you liked my work. I would be happy to do as many as you want. Let's hope that at some point I can send you some of my work, I don't know where you live specifically, but there are always ways. Thanks for your support. Blessings ✨
Do you sell them? I'd like to buy one, but first you have to find out if you could safety send to California, U.S.A.
What will you be doing this week? I hope you are feeling better!
!LADY 😍🌺🤙
View or trade
LOHtokens.@silversaver888, you successfully shared 0.1000 LOH with @dayadam and you earned 0.1000 LOH as tips. (7/30 calls)
Use !LADY command to share LOH! More details available in this post.
Yes, of course I sell them. But I would never sell one to you. I would give it to you wholeheartedly, as many as you want.
I wish I knew someone who goes there, or you can see how you can send them, I have no idea, and surely from here in Venezuela the shipping must be very expensive. I have family in the USA, but they are in palm beach, others in some other part of Miami, they don't go and come to Venezuela they can't do it, I haven't seen them for 5 years and others longer.
Soon we will see how we do, I have weeks without leaving home.
I feel a little better. But I still have to recover completely from this flu, and solve the other problem of the house, as I got sick that is still pending.
Right now I'm thinking what to do, I've been quite blocked creatively, I'm very sad because it hasn't been a good month in hive, I don't like to publish so little. Between the power failures, the internet, my pc is terrible because it is very old and freezes when I open many things and I'm editing, health, it's hard for me to publish. Soon with God's favor I will gather and compare a PC or laptop. God will help me to do it.
What I do do is see people's posts, comment on them and give them part of my humble vote hahahahaha, and I get into discord activities and healing.
I have abandoned the community of Lady, that saddens me too, I have not had a mind for writings, and well I am more of crafts than writing.
But better times will come. I know they will. Amen.
Thank you so much friend for being vigilant. I am so grateful to you for your beautiful actions and comments that motivate me, and many more people have done so. Hive is something wonderful, that came to bless my life, there are great and beautiful people.
God bless you infinitely @silversaver888 🌹💕
Nice
Thanks @artemisart 💖
Hooola mi bella amiga @dayadam, déjame decirte que en esa foto que tienes de portada te vez muy bella te sienta muy bien el color marrón combina totalmente con el color de tu cabello, pero bueno volvamos a lo que nos ocupa ese juego del collar y los sarcillos de búho quedaron muy lindos, de verdad te felicito por lo dedicada que eres en explicar el paso a paso de cada una de tus trabajos, es muy enriquecedor para la plataforma contar con tu talento.
Saludos, bendiciones y un fuerte abrazo
Hermosa amiga @sidalim88 De verdad te agradezco cada uno de los comentarios tan hermosos, enriquecedores y gratificantes que me das. Me alegra muchísimo que te guste mi trabajo desde el post hasta el resultado final, todo lo hago como tu dices con la mayor de las dedicaciones y con mucho cariño. Espero poder seguir mas a menudo compartiendo cosas como lo quisiera, pronto resolveré tantos problemas que me aquejan y lo lograre.
Ojala pronto mi semblante pueda estar como en la foto realmente lo necesito, ella es de hace bastante tiempo, muero por arreglarme mi cabello y que luzca de esa manera pronto jajajaja.
Saludos y bendiciones infinitas para ti... ✨
Quedaron hermosos, amiga @dayadam. Mis felicitaciones. Bendiciones por tus manos creativas. Saludos.
Gracias mi bella Sra @numa26 por visitarme. Me alegro que le gustara el trabajo. Amen y mil veces amen. Muchas bendiciones y éxitos para usted ✨💖
Que hermosos te quedaron amiga 😍😘 @dayadam
Muchísimas gracias amiga @aksurevm89 por pasar a visitarme. Me alegra mucho que te gustaran. Saluditos... 💖
Your content has been voted as a part of Encouragement program. Keep up the good work!
Use Ecency daily to boost your growth on platform!
Support Ecency
Vote for new Proposal
Delegate HP and earn more
Thank you very much for your support @ecency ✨
Wow, that's an owl wise this time! It looks very good dressed up on the body!
Thousands of hugs and a million blessings!
!ALIVE
!CTP
!PIZZA
@dayadam! You Are Alive so I just staked 0.1 $ALIVE to your account on behalf of @stdd. (1/10)
The tip has been paid for by the We Are Alive Tribe through the earnings on @alive.chat, feel free to swing by our daily chat any time you want.

Thanks @youarealive ❤️
👍🙏
Thank you my friend @stdd. How nice to see you here. Thank you for your beautiful comment. I'm glad you liked my work today. A thousand thanks for so much support and for the tokens you give me.
Many, many more hugs and infinite blessings for you...
Take care of yourself, and have a wonderful day...💖🌈🌞✨
🙌💛❤️🧡💙💙🧡❤️💛🙌
Have a great weekend ahead, dear!
!ALIVE
@dayadam! You Are Alive so I just staked 0.1 $ALIVE to your account on behalf of @stdd. (9/10)
The tip has been paid for by the We Are Alive Tribe through the earnings on @alive.chat, feel free to swing by our daily chat any time you want.

PIZZA Holders sent $PIZZA tips in this post's comments:
@stdd(2/10) tipped @dayadam (x1)
Learn more at https://hive.pizza.
Thanks @pizzabot 🍕❤️
Que hermosos! @dayadam, me encantan los buhos, te quedaron espectaculares, me gustaron muchísimo, saludos.
Muchísimas gracias, Un placer para mi que te gustaran @nhaydu. Bello fin de semana para ti✨
Que lindo juego de buos te quedaron geniales
Mil gracias @leidys01 😊 Saluditos✨
Ayyy pero que precioso te quedó ese jueguito ❤️ Muy bonita tu técnica.
Mil gracias. Me alegro mucho que te gustara. Saludos @royvego55 😊💕
Le diste un giro a esta técnica, desde que la mostraste quedé encantada y sigo así, un excelente tutorial.
Gracias mi corazón, que bella. Agradecida por tu valioso comentario. Me alegra muchísimo que te guste mi trabajo. Éxitos y bendiciones para ti...💕
Thank you for sharing this amazing post on HIVE!
Your content got selected by our fellow curator @hafizullah & you just received a little thank you via an upvote from our non-profit curation initiative!
You will be featured in one of our recurring curation compilations and on our pinterest boards! Both are aiming to offer you a stage to widen your audience within and outside of the DIY scene of hive.
Join the official DIYHub community on HIVE and show us more of your amazing work and feel free to connect with us and other DIYers via our discord server: https://discord.gg/mY5uCfQ !
If you want to support our goal to motivate other DIY/art/music/homesteading/... creators just delegate to us and earn 100% of your curation rewards!
Stay creative & hive on!
Thank you very much for your support @diyhub ✨
Bellisima amiga, admiro tu arte.
seria bueno aprender hacer ese tipo de manualidades para la belleza femenina.
saludos @dayadam
Mil gracias amiga @wendyth16 por pasar. Me alegra que te guste el trabajo que hago. Por aquí a la orden por si quieres aprender, inténtalo es muy linda la técnica, y se hacen bellezas con ella. Saluditos✨
Es un trabajo meticuloso y muy lindo
Bien explicado
Gracias
Gracias a ti amiga @mllg. Agradecida de verte por aquí y por tu valioso comentario. Bendiciones... ✨
♥♥♥
Hola amiga que hermoso tu proyecto, ¡me encanta!😊 ¡FELICIDADES!🌹💗
Mil gracias. Que bella @anaarevalo01. Eres bienvenida por aquí cuando lo desees, complacida de tu visita. Saludos✨
Amiga me encanta como aplicas tu técnica eres toda una experta. Muy bello tus accesorios querida amiga. Un fuerte abrazo 🤗
Gracias miga @janettbrito76 . Que linda eres, valoro mucho tu bello comentario para mi trabajo. Mi admiración para ti... Un abrazo también para ti. Éxitos✨
q lindo omma felicidades dios te bendiga
😺
Gracias bebe. Amen @shinfxx Bendiciones para ti también. Te amo💕
Te han quedado hermosísimossss ✨✨✨✨
Siempre inventando cosas tan creativas, nunca pares ✨💗
Gracias mi corazón por tu bello comentario. Éxitos @sylregne ✨
Te quedó relindo amiga....
Muchísimas gracias amigo. Un placer tenerte por aquí. Saluditos @m16uellop ✨
Que bello te quedó ese juego de collares y zarcillos con el motivo de búhos. Ay es que si viviera cerca de ti te llevaría local pidiéndote muchos diseños, jejeje. Saludos mi bella @dayadam.
Felicitaciones, tu trabajo seguirá siempre recompensado en hive, eres una gran emprendedora
Gracias mi bella @crisch23. Muy honrada por tu bello comentario. Bendiciones cariño💕
Tu te mereces eso y más, lastima que ni voto es chiriqutico
Ains tan bella. Tu también te mereces mil éxitos. Mi voto también es pequeñito. Pero ya verás que pronto podemos ayudar más, en el nombre de Dios. Abrazos mi querida @crisch23.que tengas un bello domingo. ✨🌈✨😘🤗🥰
🤪👌
Gracias por unirte a nuestra iniciativa de Celf radio y la curación en vivo "Espacio de apertura"
Gracias por el apoyo y por su excelente espacio @celf.magazine Éxitos✨✨✨
Amiga, me encantó tu trabajo, eres toda una artista