[ESP-ENG] Alambrismo: Anillo Ajustable Unisex // Wrapping: Unisex Adjustable Ring

BIENVENIDOS A MI BLOG
¡Holaaaaa, holaaaaa! Mis queridos artesanos y artesanas. Espero estén todos bien. Hoy les comparo un anillo unisex hecho con la técnica de alambrismo. Como ya han visto en mis publicaciones anteriores, esta técnica se ha convertido en un reto personal, darle vueltas y formas al alambre es una tarea que requiere mucho cuidado si queremos conseguir prendas prolijas. Todavía se me resiste un poco trabarlo pero con empeño y mucha paciencia voy a lograr hacerlas, soy persistente en lo que me gusta y como también soy un poco exigente, no me rindo muy fácilmente.
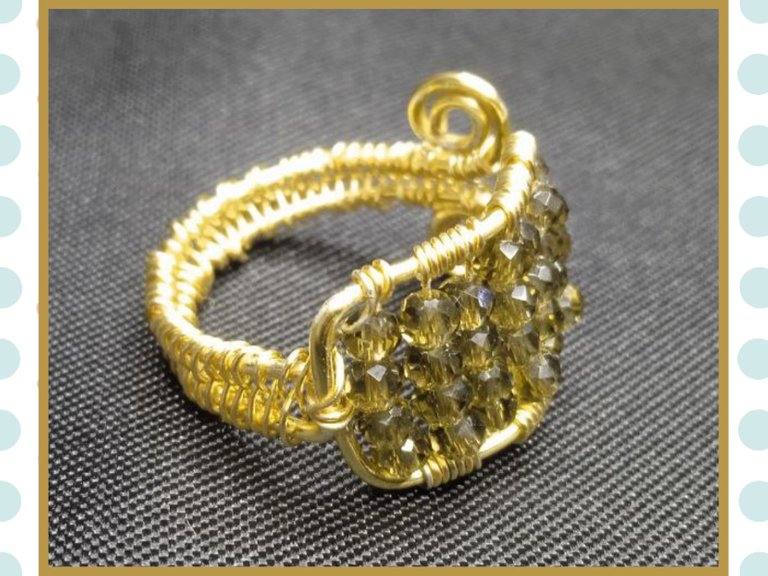
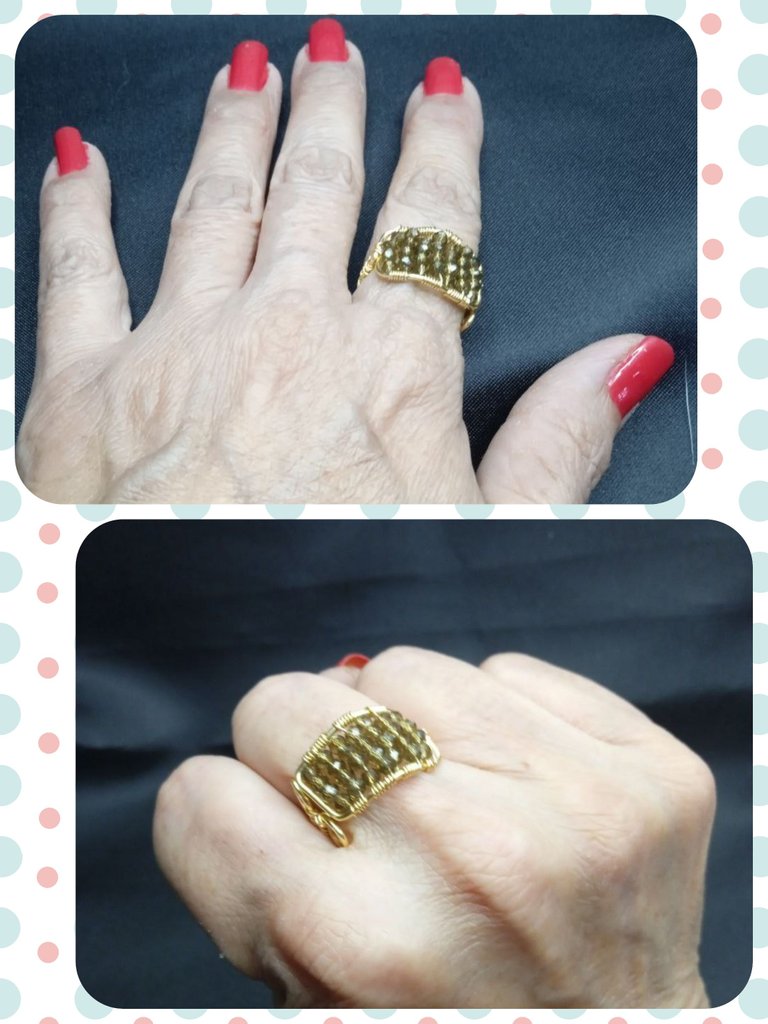
La pieza que les comparto hoy es un anillo ajustable unisex, elaborado con alambres de calibre 18 y 26 con cristales checos de 2 mm. La parte frontal se realiza con los cristales engarzados de 4 en cuatro con sostén de 4 giros de alambre #22 en cada extremo; y para el aro, realicé un tejido en forma de 8 o infinito enredado entre ambos alambres. Espero les guste. Sin más, comencemos.
WELCOME TO MY BLOG
Hellooooo, hellooooo! My dear artisans and artisans. I hope everyone is well. Today I am comparing a unisex ring made with the wire rope technique. As you have already seen in my previous posts, this technique has become a personal challenge, twisting and shaping the wire is a task that requires great care if we want to achieve neat garments. I still have a bit of a hard time sticking to it but with determination and a lot of patience I will be able to do them, I am persistent in what I like and since I am also a bit demanding, I do not give up very easily.
The piece that I am sharing with you today is an adjustable unisex ring, made with 18 and 26 gauge wires with 2mm Czech crystals. The front part is made with the crystals set 4 by four with a support of 4 turns of #22 wire at each end; and for the hoop, I made a weave in the shape of an 8 or infinity tangled between both wires. I hope you like it. Without further ado, let's get started.
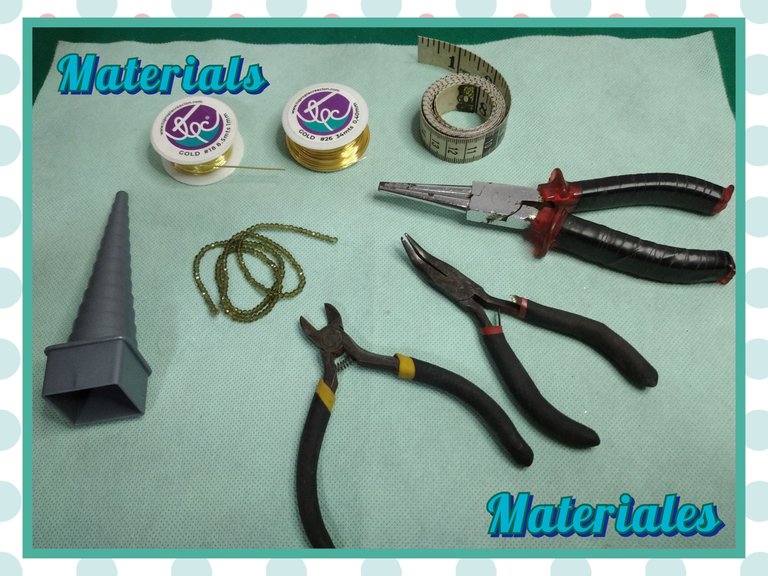
MATERIALES
- Alambres Nº18 y Nº 26
- 28 cristales checo de 2 mm color marrón
- Pinzas: corte, cónica, plana y curva
- Mandriles
- Cinta métrica
MATERIALS
- Wires No. 18 and No. 26
- 28 2mm brown Czech crystals
- Tweezers: cut, conical, flat and curved
- Chucks
- Measuring tape
STEP BY STEP // PASO A PASO
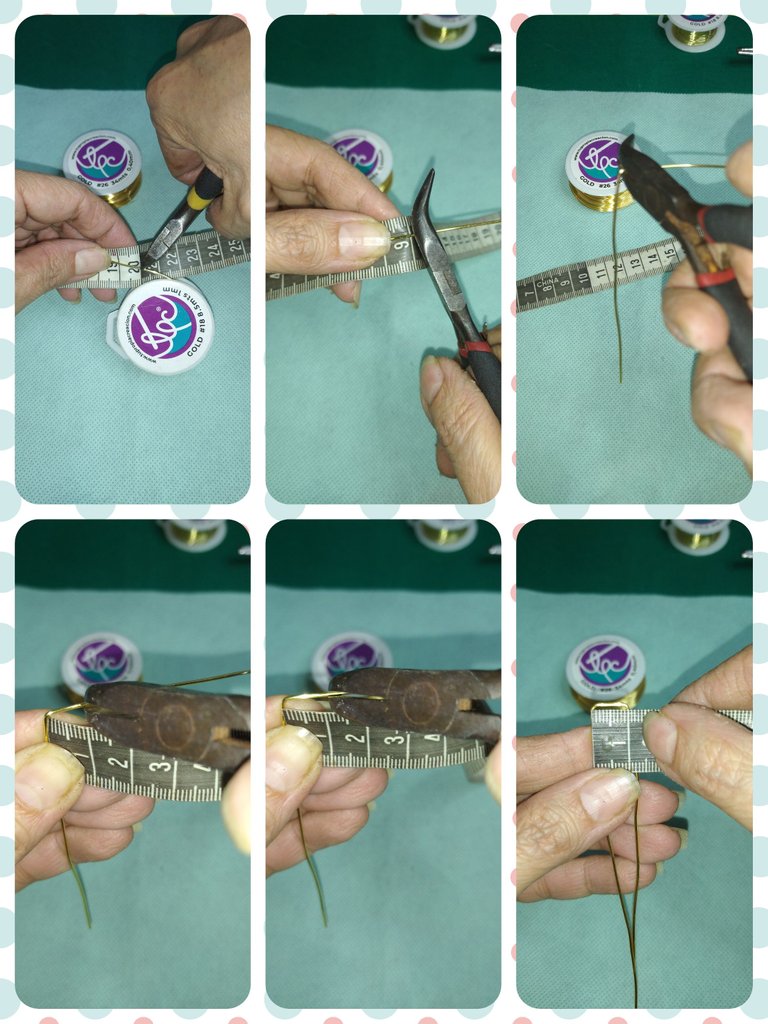
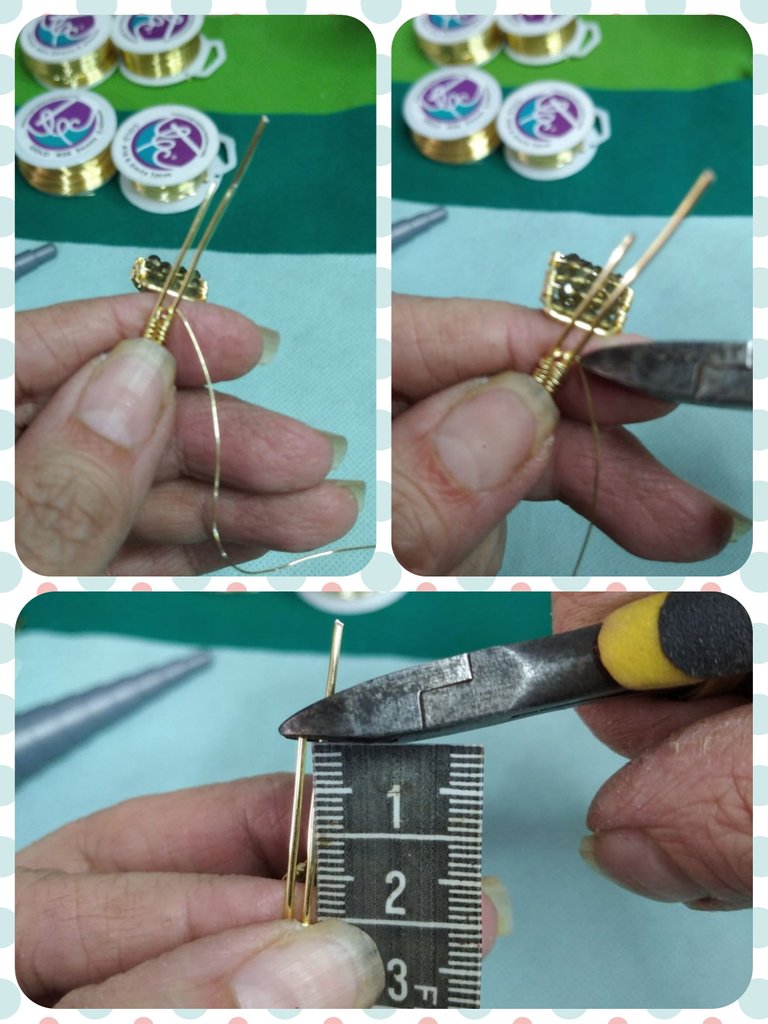
Cortamos 20 cm de alambre Nº 18. Con la cinta métrica, medimos 9,5 cm y hacemos un doblez de 90º con la ayuda de la pinza plana.
Luego medimos 1 cm a partir del doblez y realizamos otro doblez de 90º.
Cut 20 cm of wire No. 18. With the tape measure, we measure 9.5 cm and make a 90º bend with the help of the flat pliers.
Then we measure 1 cm from the fold and make another 90º fold.
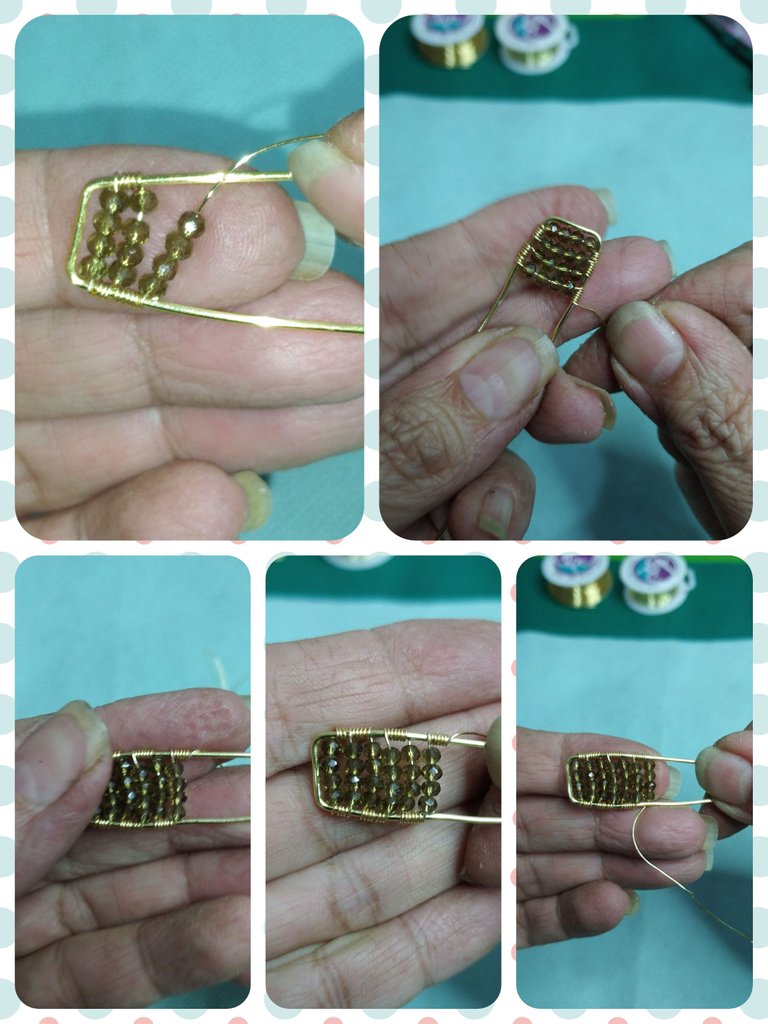
Ahora tomamos el alambre Nº26 y cortamos 1 metro para comenzar el tejido y engarce de lo que será el anillo.
En uno de los extremos del alambre Nº18 realizamos 4 vueltas con el alambre Nº 26, que quede bien apretado. Llevamos hasta el final del doblez e introducimos los 28 cristales que utilizaremos.
Now we take wire No. 26 and cut 1 meter to begin weaving and crimping what will be the ring.
At one of the ends of wire No. 18 we make 4 turns with wire No. 26, which is tight. We carry to the end of the fold and introduce the 28 crystals that we will use.
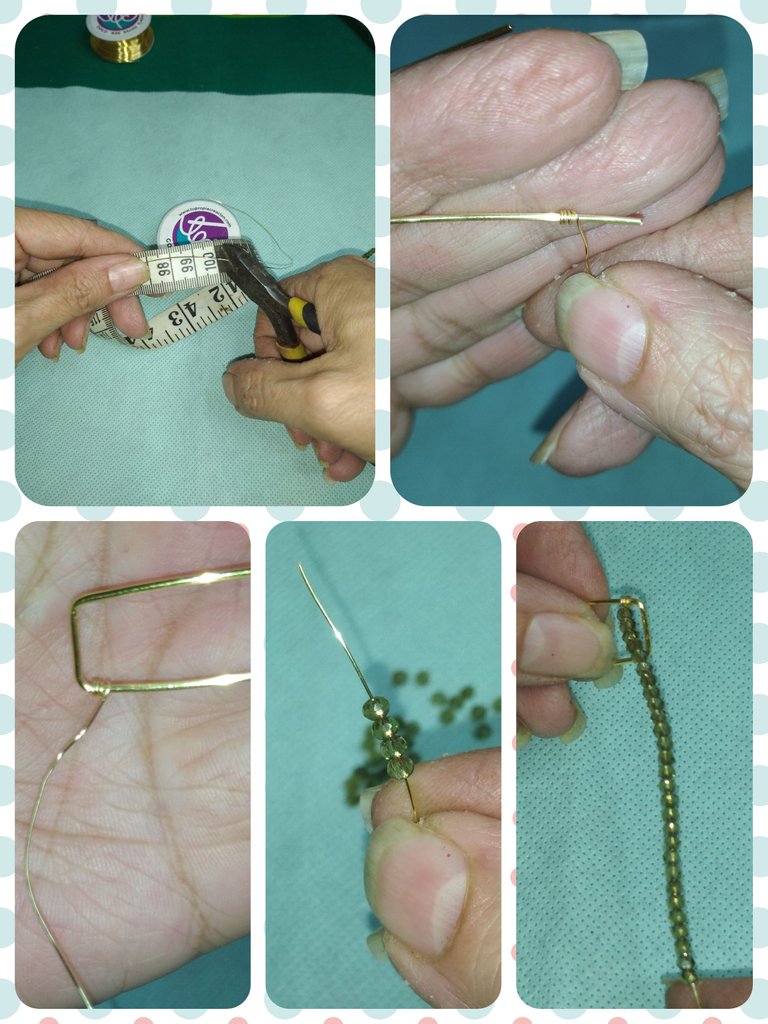
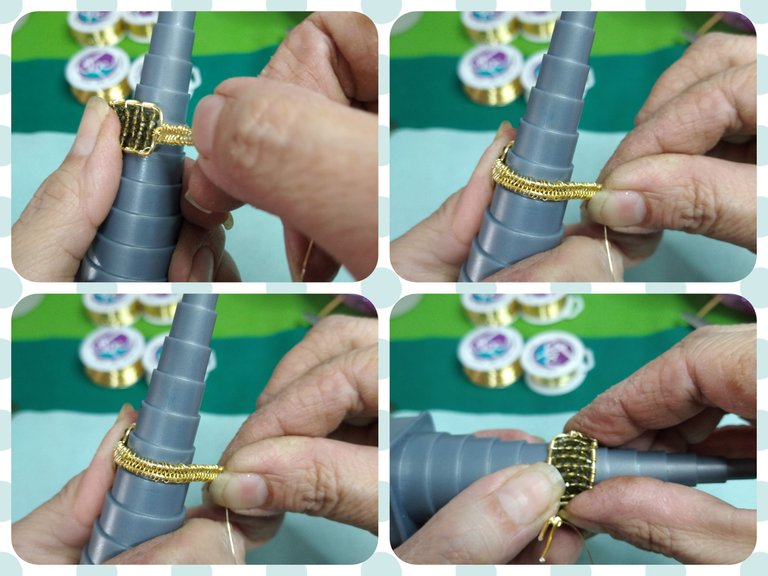
Comenzamos el entramado tomando 4 cristales que enlazaremos al extremo opuesto, realizando 4 giros con el alambre para ajustarlos bien. Luego tomamos 4 cristales más y llevamos al siguiente extremo y realizamos 6 giros para ajustar y seguir el tejido o engarzado.
We begin the framework by taking 4 crystals that we will link to the opposite end, making 4 turns with the wire to adjust them well. Then we take 4 more crystals and lead to the next end and perform 6 turns to adjust and follow the weave or crimp.
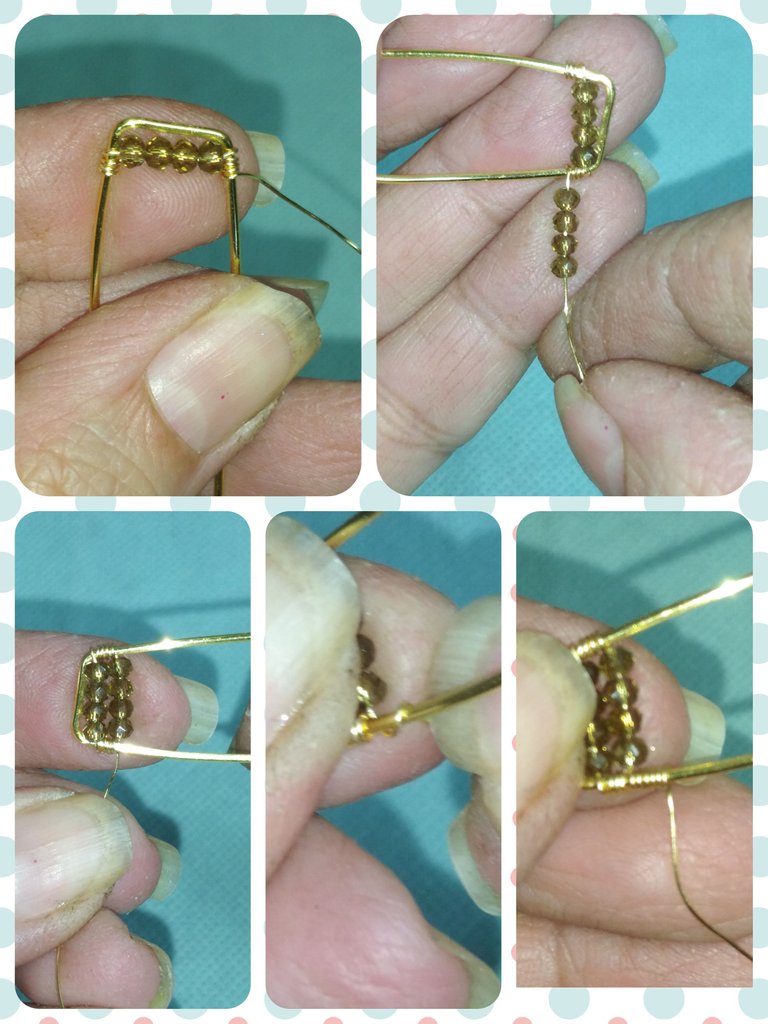
Realizamos el mismo procedimiento 5 veces más, tomando en cada vuelta 4 cristales y ajustando con 6 giros de cada lado que corresponda. En toral serán 7 líneas de 4 cristales cada uno.
We carry out the same procedure 5 more times, taking 4 crystals in each turn and adjusting with 6 turns on each corresponding side. In total there will be 7 lines of 4 crystals each.
Una vez terminado el entramado, procedemos a cerrar con el alambre Nº 18, formando un rectángulo con ambos lados del alambre. Para ello nos ayudamos con la pinza plana para hacer el doblez.
Once the framework is finished, we proceed to close with wire No. 18, forming a rectangle with both sides of the wire. For this we help ourselves with the flat clamp to make the fold.
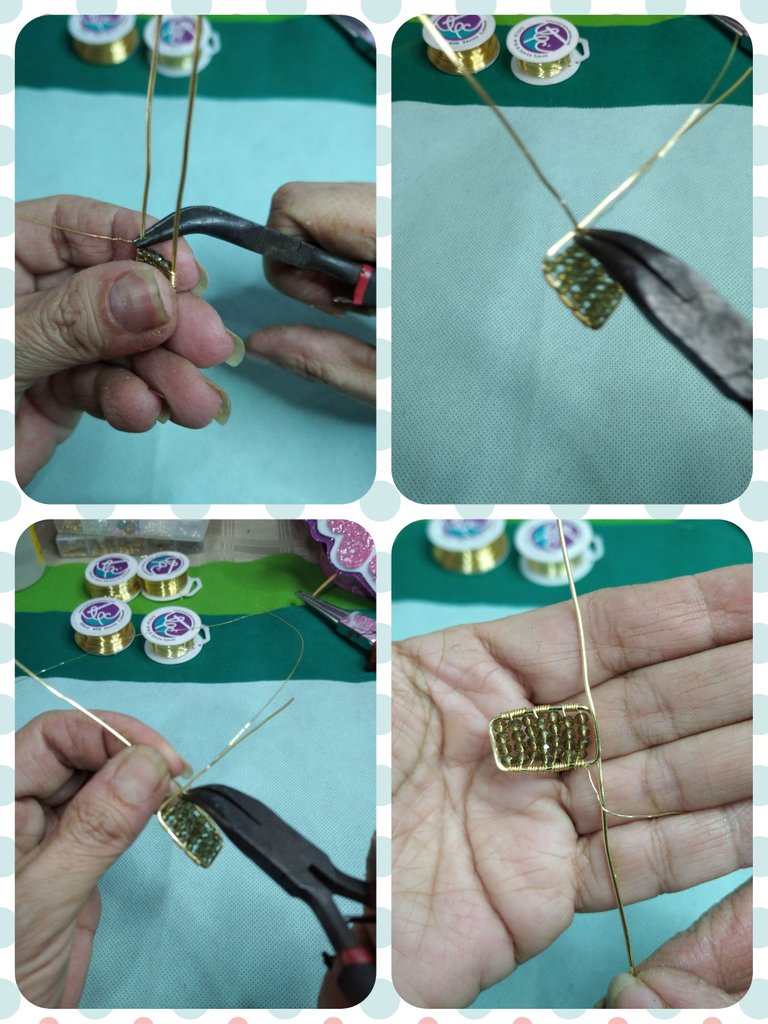
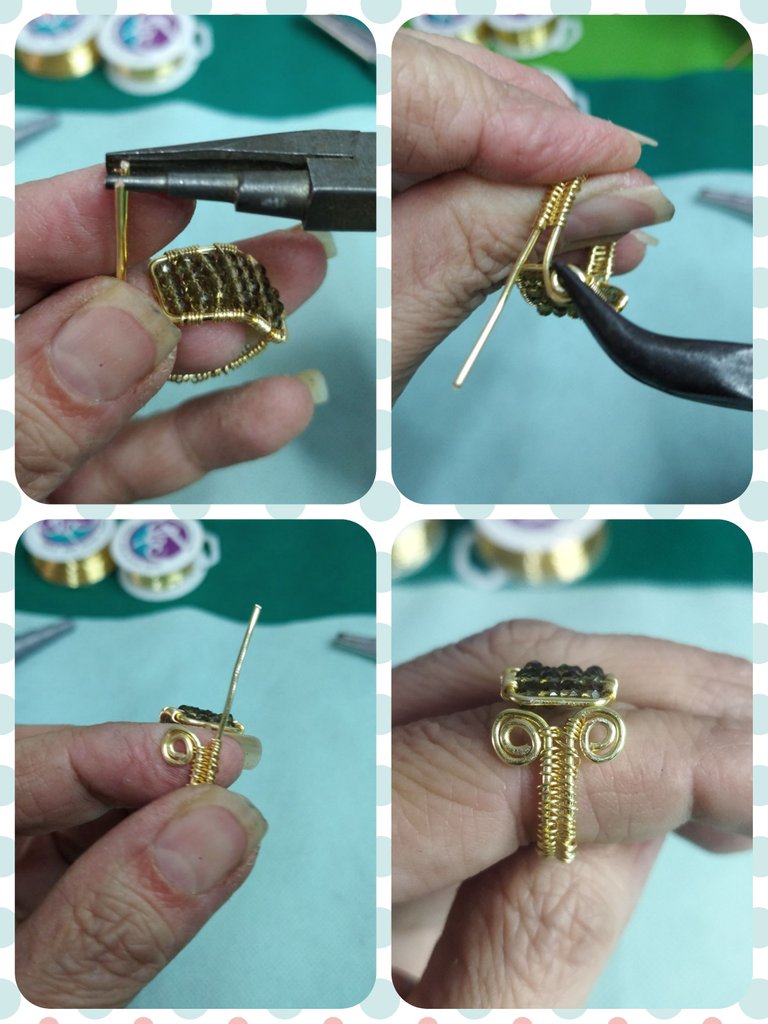
Ahora lo que haremos será tomar nuevamente cada uno de los alambres, a partir del centro, y hacemos un doblez de 90º hasta formar dos líneas con 0,30 mm de separación.
Tomamos el alambre Nº 26 y los pasamos por el centro de y realizamos dos giros en la unión de ambos alambres.
Now what we will do is take each of the wires again, starting from the center, and make a 90º bend until we form two lines with 0.30 mm separation.
We take wire No. 26 and pass it through the center of and make two turns at the junction of both wires.
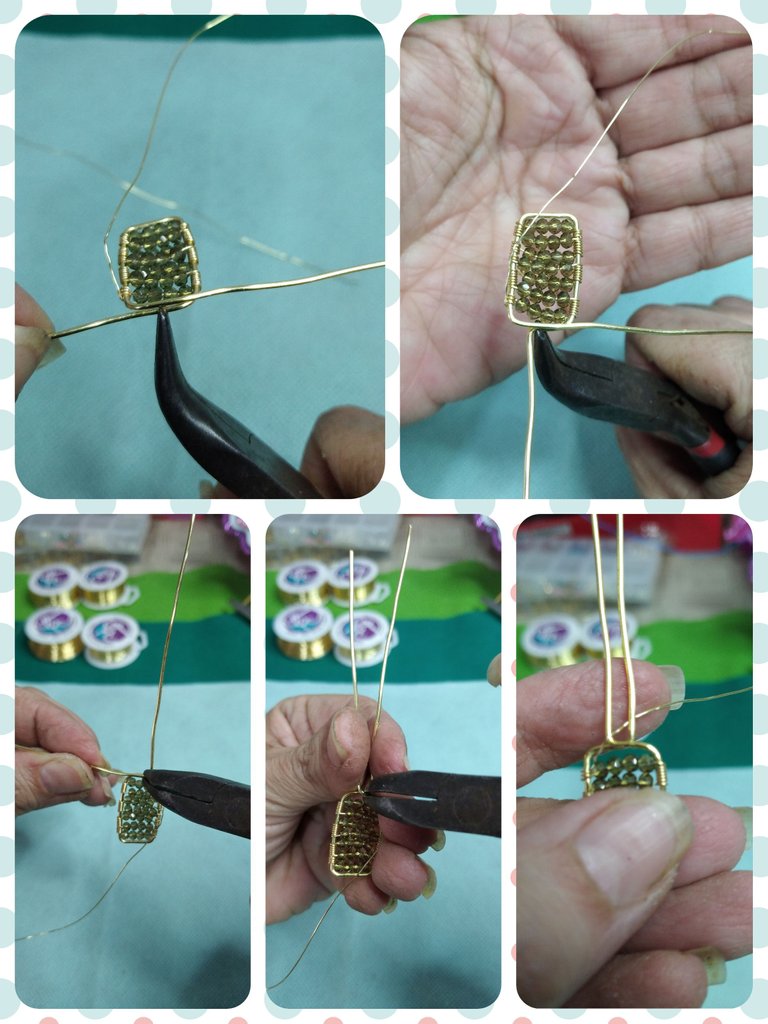
Comenzamos a realizar el tejido en forma de "8" o "∞", tantas veces hasta completar 5 cm del alambre.
We begin to weave in the shape of an "8" or "∞", so many times until you complete 5 cm of the wire.
Tomamos el mandril redondo y realizamos el anillo a la medida aproximada del dedo que lo usará, aunque este será un anillo ajustable, no debemos preocuparnos por que quede exacto.
We take the round mandrel and make the ring to the approximate size of the finger that will wear it, although this will be an adjustable ring, we do not have to worry about it being exact.
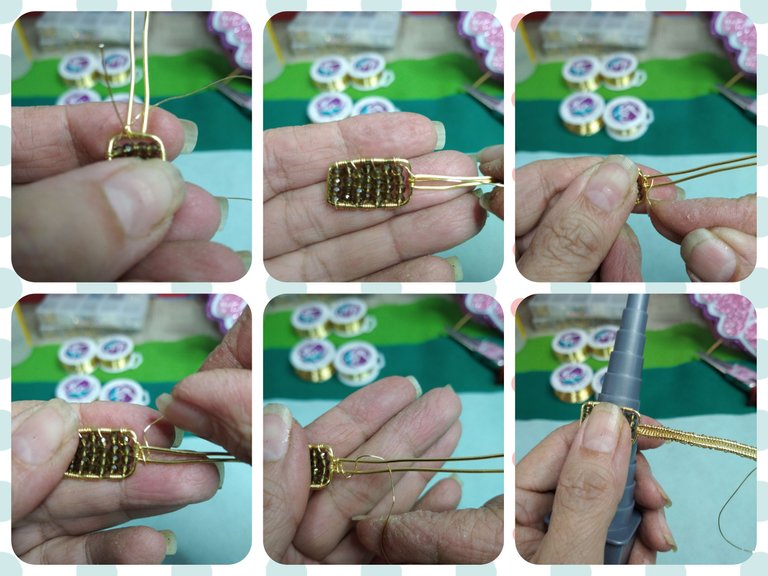
Realizamos 4 giros adicional en el poste del lado donde culminamos el tejido y cortamos el excedente de alambre # 26. Lo siguiente que haremos será cortar el sobrante del alambre # 18, midiendo 2 cm de distancia a partir del tejido del aro.
We make 4 additional turns on the post on the side where we finished the weaving and cut the excess of wire # 26. The next thing we will do is cut the excess of wire # 18, measuring 2 cm from the weaving of the hoop.
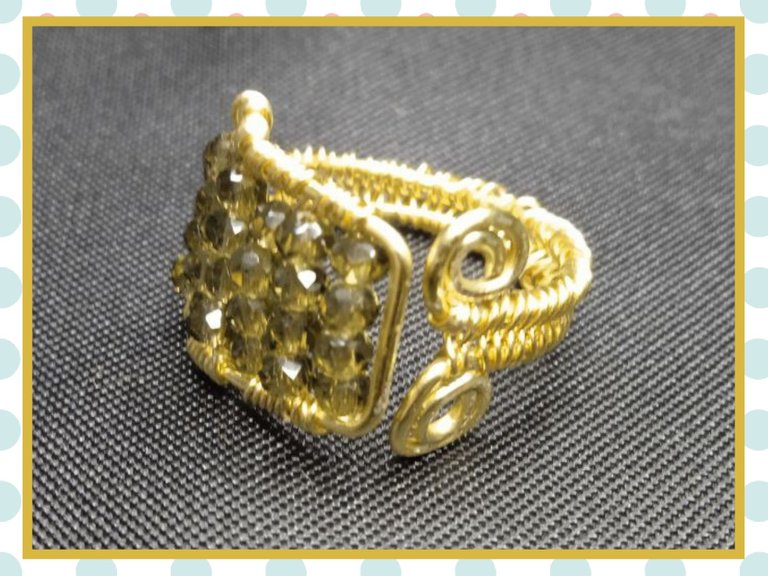
Y ya para finalizar, con los extremos sobrantes haremos unos espirales a cada lado del los extremos. Tomamos la pinza cónica y hacemos un aro y luego vamos dando forma de espiral hasta llegar al tejido. De igual forma haremos en el otro extremo.
And to finish, with the remaining ends we will make some spirals on each side of the ends. We take the conical pliers and make a ring and then we go spiraling until we reach the tissue. We will do the same at the other end.
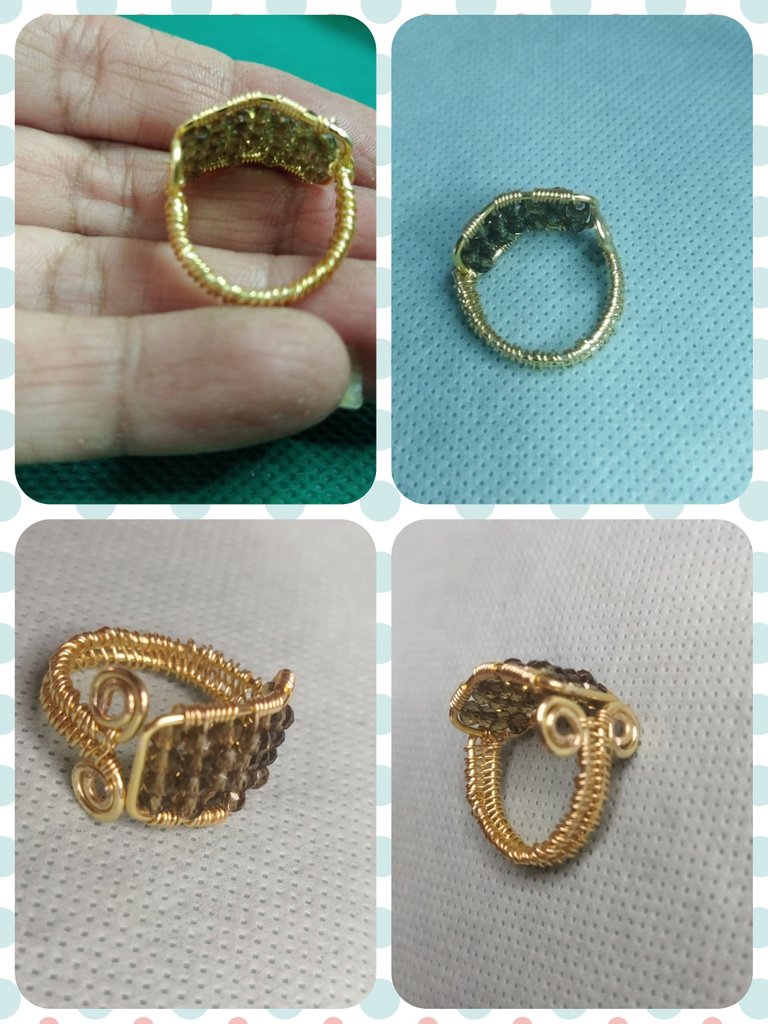
PROYECTO FINALIZADO
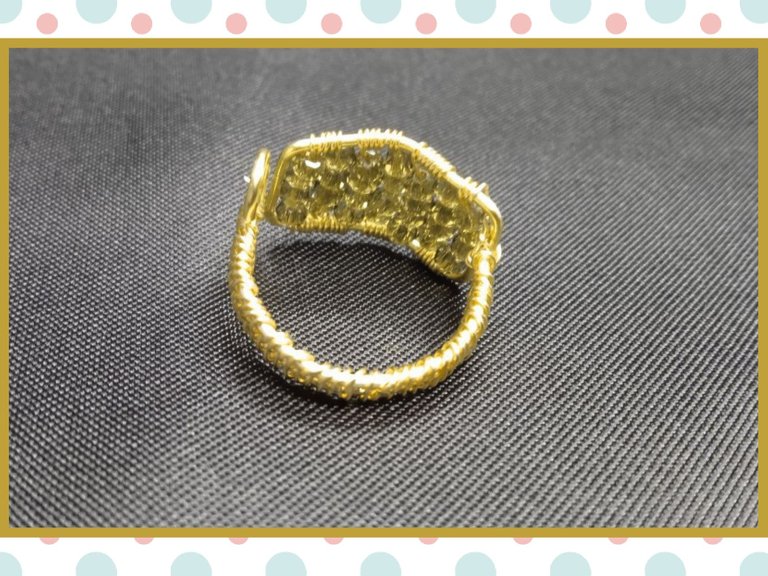
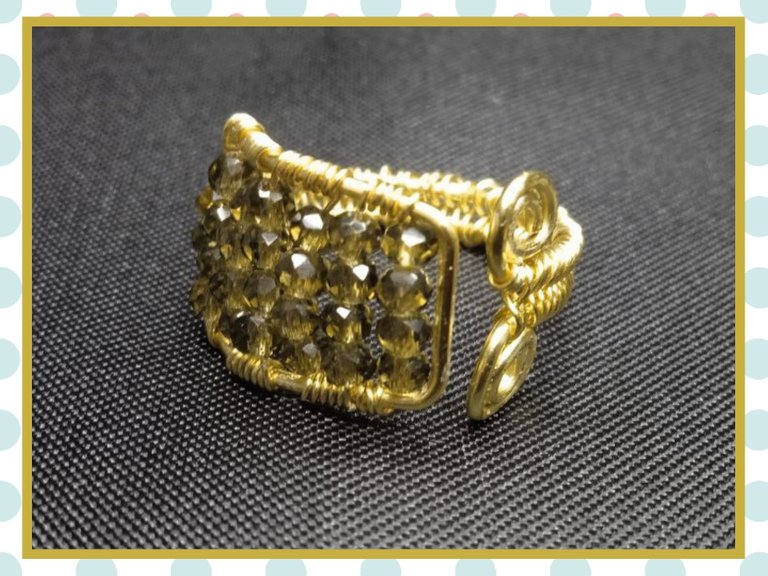
Terminando así un anillo ajustable que puede ser usado por ambos sexos. Muy elegante y sobre todo para personas que le gusta lo exuberante y llamativo. Nos vemos en la próxima.
FINISHED PROJECT
Thus finishing an adjustable ring that can be worn by both sexes. Very elegant and especially for people who like exuberant and striking. See you next time.
Thank you for sharing this post on HIVE!
Your content got selected by our fellow curator ashikstd & you just received a little thank you upvote from us for your great work! Your post will be featured in one of our recurring compilations which are aiming to offer you a stage to widen your audience within the DIY scene of Hive. Stay creative & HIVE ON!
Please vote for our hive witness <3
Este modelo de anillo está precioso!!! Hiciste un excelente trabajo porque veo que tiene varios pasos minuciosos para lograr el diseño. Me encanta que sea unisex porque ahora a los caballeros les encanta usar bisutería 😁
Gracias por dejarnos el tutorial @linita
Precisamente, pensando en esos caballeros fue que lo realicé. Mi esposo entra en ese lote 🤭🤭 y se lo probó y le gustó mucho, tanto que quiere uno pero con los cristales negros 😁😁
Buenísimo!!! Ya tienes tu primer modelo. Espero que muchos más quieran uno. Muchas suerte con eso.
https://twitter.com/98702291/status/1632489912984391680
The rewards earned on this comment will go directly to the people sharing the post on Twitter as long as they are registered with @poshtoken. Sign up at https://hiveposh.com.
Hermoso amiga, es un diseño diferente y único, me encantó.
Muchas gracias por tu comentario, me alegro que te guste 😁
Es un anillo realmente precioso y lo mejor ajustable, nos encanta como realizaste la pieza y fuiste rellenando con cristales y luego fuiste tejiendo para darle un acabado perfecto, gran trabajo 😉
Es una pieza pensada para personas de ambos sexos, ser ajustable es ideal, ya que por lo general los dedos de las damas, en algunos casos, son más delgados que el de los caballeros, así de ese modo, pueden usarlos ambos. Muchas gracias por el comentario.