Studio Photography Without a Studio?
I haven't really written about photography for a while. This had several reasons… but today I feel like writing about photography again. And to go into a bit more about a part of photography. If possible… THE most important part of photography. EXPOSURE.
Many different ways to expose your subject
No photo without light. Very simple. And of course there are different ways to expose. I usually work with natural light. Mainly outside during the day when I photograph my dogs. But every now and then I also do something different. And that is 'studio photography'. No, I don't have a studio myself. But I do have the necessary lamps, and a space that I can turn into a studio when it is really necessary. Because what many people forget is that you will of course be very happy with a nice large spacious studio for photography, but that if you don't have one, there are certainly other ways to make a studio portrait. Even if you don't have studio lighting. You can also make studio portraits with other artificial light such as flashlights!
It only matters how you use the artificial light
The only thing you really have to take into account is the way you set up your camera, and the way you use those artificial light sources!
Use a GRAY CARD!
Because a flashlight naturally gives a different color temperature, it is important to work with a gray card so that you can precisely adjust your white balance on your camera. Once you have done that, you can place the light sources that you have available as you want and you are ready to go.
Beautiful young girl
One of the portraits I have made this way is of this beautiful young girl who had never modeled for a camera.
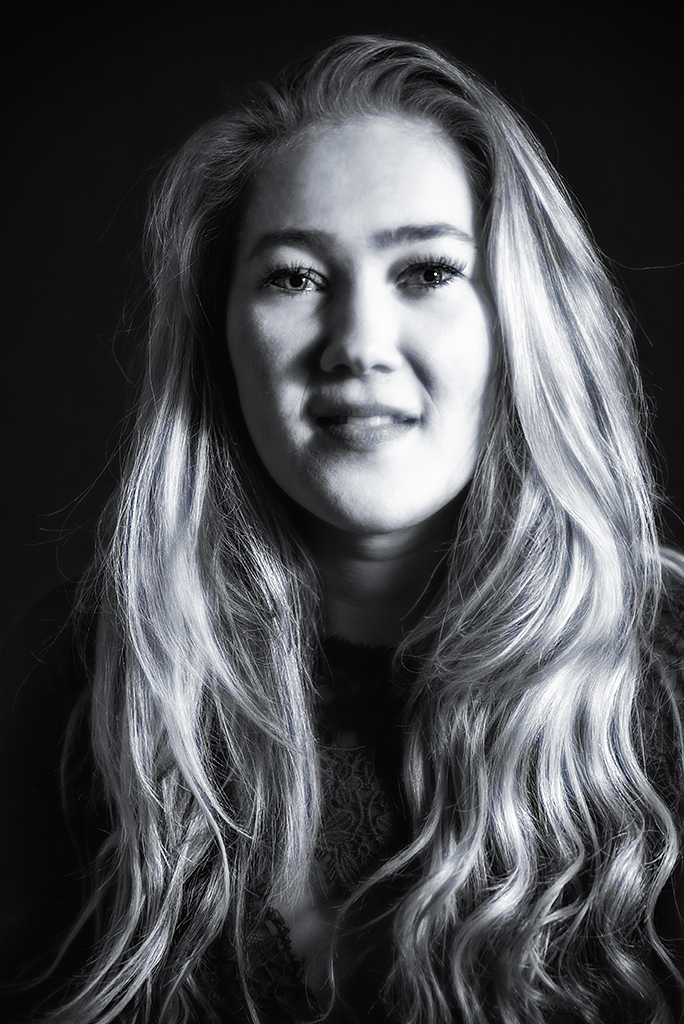
REMBRANDT EXPOSURE
For this portrait I have chosen to use an exposure technique from old painting. Because although as a photographer you are mainly concerned with taking photographs of course, and you do not paint at all… there are still a lot of things from the old painting that are used in modern photography. And one of those things is the “REMBRANDT EXPOSURE”.
A bit of history
Rembrandt was born in the Netherlands in 1606 as the ninth child of very religious parents; his mother was Roman Catholic and his father Dutch Reformed. Faith would greatly influence his works. He first went to the Latin school and then was enrolled at the University of Leiden, the oldest university in the Netherlands, but his heart was with painting. He was apprenticed to various artists in Leiden and Amsterdam and eventually opened his own studio in Leiden. There he developed his unique lighting technique — a technique that is still widely used in portrait photography today.
What is the characteristic of this exposure?
The beauty of Rembrandt's use of light lies in its simplicity. In photography, exposure is usually aimed at illuminating the subject as much as possible. With this technique, however, one side of the face is subtly left unexposed, with a small triangle of light on the cheek — characteristic of Rembrandt. This exposure is very flattering as the face looks slimmer and the cheekbones get more definition. It's also a simple way to make a portrait that might otherwise have been quite ordinary more atmospheric and intriguing.
Triangles!
If you look at this photo you can see that one side of her face has remained subtly underexposed… and that on the dark side of her face she has a triangle of light and shadow.
How do you make a portrait yourself with the REMBRANDT EXPOSURE?
Before you start creating the scene, think about what you will be using as a light source. This could be a window with a lot of light coming through, a strobe light, a softbox or as mentioned before, even a flashlight or something similar.
- Now that you have chosen a light source, you need to see if it is not too bright. If you're using natural light, consider placing a thin white cloth in front of the window to make shadows lighter and less noticeable. If you are using a strobe light or similar, a white umbrella is ideal.
- Position your subject so that the light shines at a 45 degree angle on him or her.
- If you're using a large window as a light source, it can be helpful to block out light coming in below eye level.
- Let your subject turn a little bit away from the light until the shadow of the nose creates the well-known triangle of light on the cheek. Experiment as much as you want until you find the most flattering corner.
- Once you've found the position that best reflects your topic, you can get to work.
If you have done all these parts properly, you will immediately notice a difference in the photos you take.
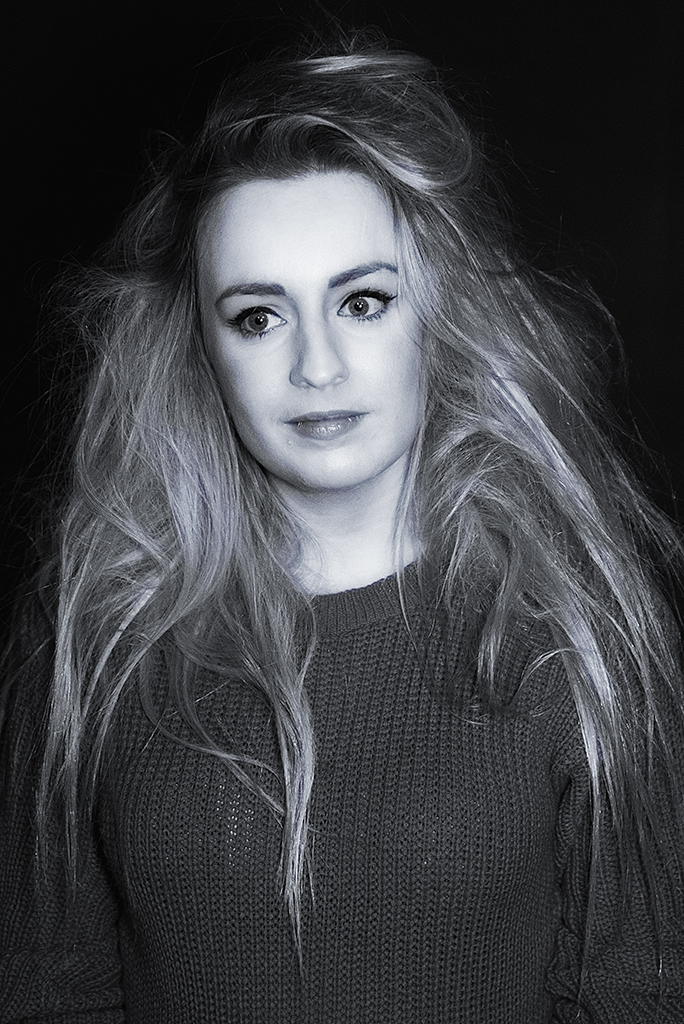
ONE light source straight from the front
A completely different technique was chosen for the second portrait. A light source straight from the front with a beauty dish evenly distributing the light, and here you see no shadows at all. But this makes the portrait look much flatter. There is no more depth.
A matter of personal taste
Now it is of course always a matter of personal taste, and depending on the effect you want to achieve as a photographer, and what the person you have in front of your camera wants.
I do love the playing with lights and shadows much more
But personally I think a portrait that can be played with light and shadow always looks much stronger than a totally flat portrait without shadows.
Try it for yourself!
If you want to try something yourself, remember that you do not always need expensive things, but that you can do a lot with what you almost always have at home. As long as you think creatively and 'out of the box'!
This post has been rewarded with an upvote from city trail as part of Neoxian City Curation program
 . We are glad to see you using #neoxian tag in your posts. If you still not in our discord, you can join our Discord Server for more goodies and giveaways.
Do you know that you can earn NEOXAG tokens as passive income by delegating to @neoxiancityvb. Here are some handy links for delegations: 100HP, 250HP, 500HP, 1000HP. Read more about the bot in this post. Note: The liquid neoxag reward of this comment will be burned and stake will be used for curation.
Thank you!
View or trade
BEER.Hey @hetty-rowan, here is a little bit of
BEERfrom @pixresteemer for you. Enjoy it!Learn how to earn FREE BEER each day by staking your
BEER.Awesome. Voted on behalf of Neoxian
Thank you @sayee
Don't need to use a grey card if you shoot RAW - as you can adjust white balance to the temperature of the light in camera raw. Sure, it takes longer than doing a custom WB (if you're not used to doing this) - but its the lazy fix to shoot under any light.
The only problem with using different sorts of lights for studio-esque shots is when each light is a different temperature, and then... its annoying to fix the colour temperature for each and every different light.
Very true but this blog was just to show that you don't always NEED expensive studio equipment and that you still can shoot 'studio portraits'. I always shoot RAW, but I like to adjust the white balance before because after shooting it takes more time, unless you do a batch edit.
All you need is light :) Just anything that generates it and absorbs it or reflects it. I'd rather spend $2k on lights than $2k on cameras or lenses at this point!
(They don't even have to be photographic lights!) - Just... lights! :D
Right ... without light, no photo. As simple as that.
Twitter Posh https://twitter.com/ForeverHero7/status/1292744112555335680
!bro
Posted via neoxian.city | The City of Neoxian
.